FOG Light Switch, using Blazer wiper switch???
Moderator: F9K9
FOG Light Switch, using Blazer wiper switch???
OK,
Heres the deal. I want to add fog/Off Road lights to my Safari Bar. My truck already has OEM fog lights.
So, I want to install a switch in the blank spot near my radio:
blank spot near radio image
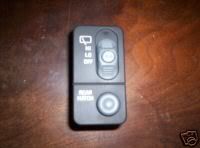
I want to install a custom switch or the blazer switch like this one:
Does anyone know what the process is to wire new lights through this switch?
Thanks!
Last edited by hubof on Thu Jul 05, 2007 5:43 am, edited 1 time in total.
[size=75] 02' Sonoma Crew Cab ZR5 - 2" BDS Body Lift - Bilstein Shocks - 31x10.5" Wildcountry XTX Sport - Westin Safari - Light Bar w/ 100watt 6" Lights (soon) - Custom Flowmaster Dual Exhaust - Kenwood MP3/CD Player - 8" Bazooka Sub w/ builtin amp - custom grill insert - blue instrument panel - K&N Cold Air Intake[/size] -
- HenryJ
- Admin K Elite
- Posts: 12705
- Joined: Tue Oct 01, 2002 9:14 pm
- Location: Ontario, Oregon
- Contact:
Yes - Wiring question
I use mine for the aux. fuel transfer pump, one for each axillary tank and front mounted fog lights.
I still have a position to add one more accessory in the future. Just think of it as a five position switch
The Crew Cabs received the wiring of the utility (Blazer) not the pickup. So We do have the wiring for the hatch release and rear wiper controls.
Heres the available wiring:
Pin A YEL = Accessory Voltage
Pin B DK GRN = Rear Window washer Control
Pin C GRY = Rear Window Wiper Switch Signal
Pin D BLK = Trunk Release Switch Signal
Pin E BLK = Ground
Pin F GRY Instrument Panel Lamp Fuse Supply Voltage
I installed some LEDs since the picture you posted above. Two yellow and a green. One for each fuel tank and one for the fog lights.
I used the YEL for my switch to supply, small GRY dash lights, Green for push to supply, BLK for ground, then added a couple wires of my own for wiring to the relays.
Modding the wiper / hatch release switch
I used three 1/8" 12 volt LED's from Painless wiring Here is another source for 12 volt LED indicator lights - Streetworks
I did modify the internal lighting of the switch by removing part of the optical plastic that lights the left portion of the switch plate. and sanded the pictogram off the washer button.
The left side did not turn out as I would have liked, so I just put some opaque vinyl over it and installed the LED's.
The LED's are just a press fit. Drill the holes and push them in.
The upper yellow LED lights when my front aux. fog lights are on. The green LED lights while holding the momentary switch for the fuel transfer pump as does another yellow I mounted next to it for the other fuel transfer tank.
Here are some quick shots of what to do:
Disassemble the switch. Just push in the four grey hooks that hold the face to the white back to release.
Then pull the clear plastic piece out
You will need to cut off the top and bottom parts (sorry for some of the blurry pics, I was doing this in a hurry)
I used two coats of primer on the inside , drilled one of the 5/32" holes for a LED, then painted the primer black.
Of course for the finished product I would paint the entire piece to match the dash and cover up the lettering on the front.
Push the LED into place and drill a 5/32" hole in the side of the back for the wires to exit.
Put all the pieces back in place. Push the wires through the hole.
Snap it back together.
You will need to install a relay. Here is a diagram:
#85 , green positive relay activate
#86 , black negative relay activate
#30 , yellow supply
#87 , white Normally open to accessory
#87a , black Normally closed to accessory
To get the wires into the engine compartment you can go through the rubber boot on the bundle that comes through the drivers side firewall , between the fender and brake booster.
To do this remove the lower dash panel that includes the OBDII port, above the drivers footwell. You will need a long piece of rod. I use gas welding rod, or fluxless brazing rod. A straightened metal coat hanger may work well too.
Poke it through the rubber boot from the engine compartment piercing through to the inner seal and into the footwell. If the rod is thin like the welding rod I bend the end back in itself and insert the stripped end of a wire through the tightened loop. The tape it tightly and pull it back through to the engine compartment. The next time will be easy as the rod will follow the wire back through.
For powering the lights you will need to add an accessory power source. Energizing the fused accessory power stud in the engine compartment power distribution center-
...is as simple as adding a maxi fuse and 6mm-1.00 nut. For terminal ends a 1/4" hole should work-
This is a handy place to provide power for added accessories.
Be sure to check the sticky , Cable Gauge Selection Chart ( Wire size table ) , in this forum for the proper sized wiring.
Last edited by HenryJ on Sat Sep 29, 2007 2:27 pm, edited 1 time in total.
"Speed doesn't kill, suddenly becoming stationary does." - Richard Hammond
"Speed is just a matter of Money - How fast do YOU want to go?"-Mechanic from Mad Max-
If at first you don't succeed - Don't take up Skydiving! - ThunderII KE7CSK
HJ you are the man with the info!!!! Now that I how it can be done, I will get the switch ordered soon.
[size=75] 02' Sonoma Crew Cab ZR5 - 2" BDS Body Lift - Bilstein Shocks - 31x10.5" Wildcountry XTX Sport - Westin Safari - Light Bar w/ 100watt 6" Lights (soon) - Custom Flowmaster Dual Exhaust - Kenwood MP3/CD Player - 8" Bazooka Sub w/ builtin amp - custom grill insert - blue instrument panel - K&N Cold Air Intake[/size] -
- HenryJ
- Admin K Elite
- Posts: 12705
- Joined: Tue Oct 01, 2002 9:14 pm
- Location: Ontario, Oregon
- Contact:
The salvage yards are full of them now. They run under $5. I picked up a couple for $1 each.
"Speed doesn't kill, suddenly becoming stationary does." - Richard Hammond
"Speed is just a matter of Money - How fast do YOU want to go?"-Mechanic from Mad Max-
If at first you don't succeed - Don't take up Skydiving! - ThunderII KE7CSK
Re: FOG Light Switch, using Blazer wiper switch???
Tagged for future reference.
Re: FOG Light Switch, using Blazer wiper switch???
What do I need to know about using the fog light switch on the left side of the steering wheel in a truck that doesn't have fog lights?
I planning on using it to switch lights in the bed.
http://www.s10forum.com/forum/f136/98-s ... lp-436542/
Is there an easier way?
If I have to do that, I will be using it for a different purpose.
Any help you guys can provide would be great.
the wiring for the switch is behind my dash plugged into a dummy port, i got a new switch, and installed it, there is a fuse relay for fog lamps in that box under the hood, but i cant find the wires in the front end for the fogs, it doesn't have any factory fogs, but im installing on the brush guard i got for it, i want it wired like its supposed to be, any ideas...? id like to know where the wires are and what color they are...
I added factory fogs to my truck last year. The truck does not have the wiring in place, you will need to do your own wiring for it.
I did however make mine work with the factory fog light switch, momentary push button on/off. Took 5 relays but works great. The only factory part I used to contorl them was the switch.
check this out. http://www.the12volt.com/relays/page5.asp#lsp
I am trying to wire up some offroad lights on my bumper with the factory fog switch. My truck did not come from the factory with fogs. I got the switch from the junkyard out of a 2003 s10. My truck does have the fog lamprelay with all 4 pins installed in the block. It gets 12v to the 30pin like it should but nothing to the 87 pin when the switch is pressed. The wires for the switch are black, orange, gray, and purple.
Black = Ground
Orange = 12v
Gray = 12v Illumation with the headlights on
Purple = Should be the switch wire correct? well I get no reading at all, just 0v no matter how many times I press the switch with the headlights on or not. I get nothing from the purple wire at all.
Or is there a way to wire the switch so I could use it for my offroad lights and still have it look factory?
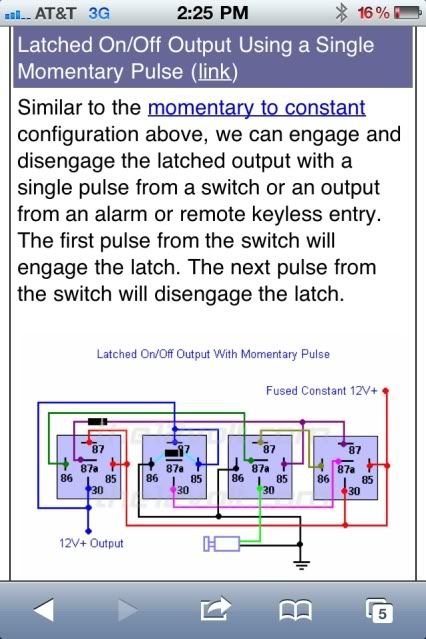
Is the "Latched On/Off Output Using a Single Momentary Pulse" diagram in the link what I need to follow to do this?Whats the hard way of wiring it so i can use the factory switch?
Is there an easier way?
If I have to do that, I will be using it for a different purpose.
Any help you guys can provide would be great.
- HenryJ
- Admin K Elite
- Posts: 12705
- Joined: Tue Oct 01, 2002 9:14 pm
- Location: Ontario, Oregon
- Contact:
Re:
Yes. No easier way. I have yet to find a bi-polar latching relay that will fit this application. I did not end up using the momentary switch for lights. I used them both for auxiliary transfer pumps. (no latching required)_STUCKY wrote:Is the "Latched On/Off Output Using a Single Momentary Pulse" diagram in the link what I need to follow to do this?
Is there an easier way?
"Speed doesn't kill, suddenly becoming stationary does." - Richard Hammond
"Speed is just a matter of Money - How fast do YOU want to go?"-Mechanic from Mad Max-
If at first you don't succeed - Don't take up Skydiving! - ThunderII KE7CSK
Re: FOG Light Switch, using Blazer wiper switch???
So.... To get the 3 momentary switches (factory fog lights, rear hatch, and washer sprayer) to be on/off switches, I would need 12-15 relays?
That does not sound like any fun...
- HenryJ
- Admin K Elite
- Posts: 12705
- Joined: Tue Oct 01, 2002 9:14 pm
- Location: Ontario, Oregon
- Contact:
Re: FOG Light Switch, using Blazer wiper switch???
Yes, using relays.
The stock fog lamp can be used by swapping BCM. I have my stock one. No Tow/haul, but it did have factory fogs.
If you found a BCM from a Blazer, or Bravada with tow/haul and fogs, you would be all set to use the stock wiring. The BCM takes care of latching the circuit.
The stock fog lamp can be used by swapping BCM. I have my stock one. No Tow/haul, but it did have factory fogs.
If you found a BCM from a Blazer, or Bravada with tow/haul and fogs, you would be all set to use the stock wiring. The BCM takes care of latching the circuit.
"Speed doesn't kill, suddenly becoming stationary does." - Richard Hammond
"Speed is just a matter of Money - How fast do YOU want to go?"-Mechanic from Mad Max-
If at first you don't succeed - Don't take up Skydiving! - ThunderII KE7CSK
Re: FOG Light Switch, using Blazer wiper switch???
I will keep my eyes peeled.HenryJ wrote: If you found a BCM from a Blazer, or Bravada with tow/haul and fogs, you would be all set to use the stock wiring. The BCM takes care of latching the circuit.
If I go that route, I assume that I will still have to wire up the window washer and rear hatch buttons with relays if I want them to be on/off buttons?
As for the rear wiper part of the switch, when it is in the "hi" position, are both the "hi" and "lo" circuits powered? Or just 1 at a time?
Also, I am confused as to why you needed to wire in a relay. What is the purpose of that?
Thank you, Brule.
- HenryJ
- Admin K Elite
- Posts: 12705
- Joined: Tue Oct 01, 2002 9:14 pm
- Location: Ontario, Oregon
- Contact:
Re: FOG Light Switch, using Blazer wiper switch???
The relay flows amperage safely that the switch can not handle.
Each is separate IIRC.
Remember you will need to have the dealer unlock a donor BCM.
Each is separate IIRC.
Remember you will need to have the dealer unlock a donor BCM.
"Speed doesn't kill, suddenly becoming stationary does." - Richard Hammond
"Speed is just a matter of Money - How fast do YOU want to go?"-Mechanic from Mad Max-
If at first you don't succeed - Don't take up Skydiving! - ThunderII KE7CSK
http://www.the12volt.com/relays/page5.asp#lsp
HJ, would you look this over again for me, purdy purdy please with cherries and such. I just want to double check before I try wiring anything up to the truck. The 4 relay with 2 diode method is my goal.
The new plan is to use the "Rear hatch" button to turn on bed lights.
I went to the junkyard yesterday in search of a donor s10 with fog lights and tow/haul mode. No dice, but I did find these:
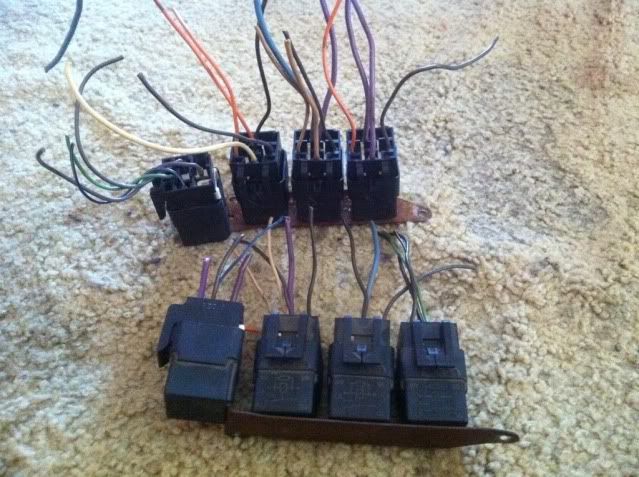
They are from behind the glove box in 88-98 full size Chevy trucks. I found several, but only took 3. They each hold 4 Hella relays that clearly say made in the USA. I mostly saw these with 4 relays, but did see a couple with 3, and one that only had 2. I only grabbed the ones with 4 relays.
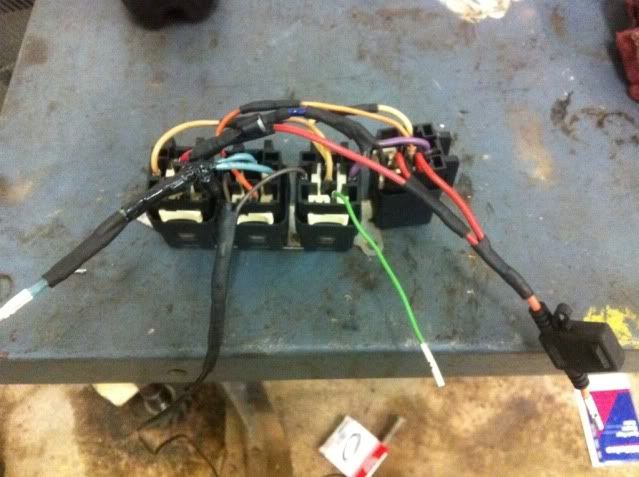
I took them all apart last night and wired one up like the diagram. The only thing left to do is finish wiring in the 2 diodes, then I think it is ready.
My only other question is, should I mount this in the cab somewhere, maybe behind the dash if I can find room, or would it be ok attached to the inside of the topper? The bed does get pressure washed out occasionally and these are not 100% sealed.
I'll post a picture of the finished product when I get the diodes wired in. This process has made my brain hurt
- HenryJ
- Admin K Elite
- Posts: 12705
- Joined: Tue Oct 01, 2002 9:14 pm
- Location: Ontario, Oregon
- Contact:
Re: FOG Light Switch, using Blazer wiper switch???
Those relays will work in a wet environment, wires down so they drain if they get wet. You are right, they are not sealed. Not designed to get wet, but will survive a pressure wash if oriented to where they will not fill up with water.
Personally, wires in the bed..ok. Better shielded underneath. Electronics (relays, modules, etc) not so much. Too easy to get smashed or crushed by loaded cargo, unless well protected. Underneath not a good idea. Cab or underhood is a better choice.
"Speed doesn't kill, suddenly becoming stationary does." - Richard Hammond
"Speed is just a matter of Money - How fast do YOU want to go?"-Mechanic from Mad Max-
If at first you don't succeed - Don't take up Skydiving! - ThunderII KE7CSK
Re: FOG Light Switch, using Blazer wiper switch???
Fingers crossed!
- HenryJ
- Admin K Elite
- Posts: 12705
- Joined: Tue Oct 01, 2002 9:14 pm
- Location: Ontario, Oregon
- Contact:
Re: FOG Light Switch, using Blazer wiper switch???
You can bench test it using a little nine volt battery.
"Speed doesn't kill, suddenly becoming stationary does." - Richard Hammond
"Speed is just a matter of Money - How fast do YOU want to go?"-Mechanic from Mad Max-
If at first you don't succeed - Don't take up Skydiving! - ThunderII KE7CSK
Re: FOG Light Switch, using Blazer wiper switch???
If you want weatherproof, find a few different cavalier/sunfires in the junkyard that have had the GM starter fire recall thingy. They are bolted to the core support on the engine side. Super easy to remove and 100% weather resistant/proof.
2004 Indigo CC, 235/75/15 Cooper Discoverer at3's,shaved TB blade and chopped air box, Big 3, quadbeams, Added G80 and kept my 3.42's, leer shell (my $75 CL score), 3 car seats, Soon to have a 1.5-2" lift t-bar crank and rear shackles.
2000 Blazer LT, TB Mod, Big3, Chopped air box, Quadbeams, and a bunch more crap coming.
Re: FOG Light Switch, using Blazer wiper switch???
Indigo04 wrote:If you want weatherproof, find a few different cavalier/sunfires in the junkyard that have had the GM starter fire recall thingy. They are bolted to the core support on the engine side. Super easy to remove and 100% weather resistant/proof.
Roughly what year range? And how many relays do they have? Thanks for the tip, I'll keep my eyes open.
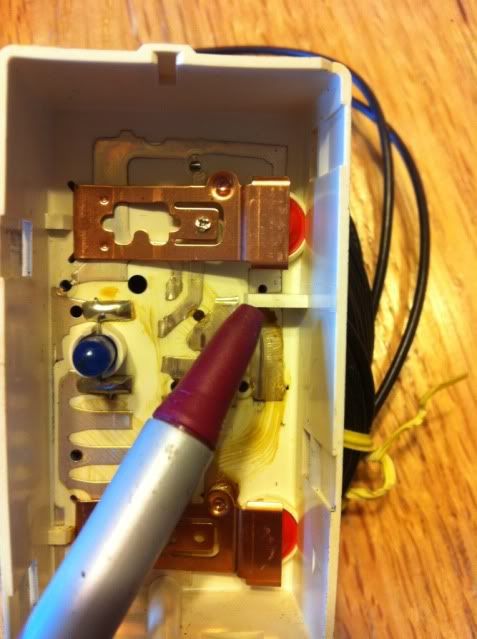
The washer fluid button will not make a connection unless the wiper switch is on. Take the switch apart and cut the little plastic "wall" on the top right side to allow the button to make a connection in any position. I used a dremil.
Question, are these switches known for going bad like many of GM's electric gizmos? Reason I ask is I cannot get the switch to light a test light in the "hi" position or when I push the "rear hatch" button. I was wanting to use either the "rear hatch" or the fog light button for this, but I can't get either to do anything. I have a line on another switch, but it will be a few days before I can go get it.
Re: FOG Light Switch, using Blazer wiper switch???
It works.... Kinda....
So I wired up the washer fluid button using 4 relays and 2 diodes:
This is from here:
http://www.the12volt.com/relays/page5m.asp#_index
I can only get the button to turn on the lights when the ignition is off.
The only thing I can see that is different than the diagram is that I used a separate ground for the relays and the switch, but hooking it up with a common ground didn't change anything.
I do not know what to try next. Suggestions? I'm deep enough into this that I want to figure it out.
- HenryJ
- Admin K Elite
- Posts: 12705
- Joined: Tue Oct 01, 2002 9:14 pm
- Location: Ontario, Oregon
- Contact:
Re: FOG Light Switch, using Blazer wiper switch???
Are your diodes in the correct direction?
"Speed doesn't kill, suddenly becoming stationary does." - Richard Hammond
"Speed is just a matter of Money - How fast do YOU want to go?"-Mechanic from Mad Max-
If at first you don't succeed - Don't take up Skydiving! - ThunderII KE7CSK
Re: FOG Light Switch, using Blazer wiper switch???
That is what I thought as soon as I hooked the ground up like the diagram and it didn't work. But I checked and they are in the way the diagram shows.
I did notice that if I touch the test light to the green wire, the lights come on/off. It also is very faintly lighting the test light. This tells me that a small amount of juice is coming through to the green wire.
Could the diagram have the diodes backwards? I am not sure where to find another diagram to compare.
I was about to rip it all out and start over, and still might.
- HenryJ
- Admin K Elite
- Posts: 12705
- Joined: Tue Oct 01, 2002 9:14 pm
- Location: Ontario, Oregon
- Contact:
Re: FOG Light Switch, using Blazer wiper switch???
Maybe a bad diode?
"Speed doesn't kill, suddenly becoming stationary does." - Richard Hammond
"Speed is just a matter of Money - How fast do YOU want to go?"-Mechanic from Mad Max-
If at first you don't succeed - Don't take up Skydiving! - ThunderII KE7CSK
Re: FOG Light Switch, using Blazer wiper switch???
Perhaps. The diodes are used. I stopped at the local battery/alternator/12 volt stuff shop to get diodes. The guy gave them to me and said something like "I don't understand what you are doing. Here's some diodes. Come show me what you did after it works. " lol
I think I will make version 2.0 and see what happens.
On the plus side, the LEDs I put in the bed are a lot brighter than expected.
I think I will make version 2.0 and see what happens.
On the plus side, the LEDs I put in the bed are a lot brighter than expected.
- HenryJ
- Admin K Elite
- Posts: 12705
- Joined: Tue Oct 01, 2002 9:14 pm
- Location: Ontario, Oregon
- Contact:
Re: FOG Light Switch, using Blazer wiper switch???
De-bouncing the relays can present a problem too. I went with five relays and had one working, but opted to keep mine momentary in the end.
"Speed doesn't kill, suddenly becoming stationary does." - Richard Hammond
"Speed is just a matter of Money - How fast do YOU want to go?"-Mechanic from Mad Max-
If at first you don't succeed - Don't take up Skydiving! - ThunderII KE7CSK
Re: FOG Light Switch, using Blazer wiper switch???
De-bouncing? After a quick google search, I can't say I understand.
As far as using 5 relays, if I had a bracket to hold 5 relays, I'd try it. I couldn't find anything that held more than 4.
I'll tackle making another set of relays this weekend.
As far as using 5 relays, if I had a bracket to hold 5 relays, I'd try it. I couldn't find anything that held more than 4.
I'll tackle making another set of relays this weekend.
Re: FOG Light Switch, using Blazer wiper switch???
So, I have redone the relays, with different diodes, and still the same result. It only works with the ignition off.
I have checked and rechecked everything I can think of.
Where do I go from here?
I have checked and rechecked everything I can think of.
Where do I go from here?
- HenryJ
- Admin K Elite
- Posts: 12705
- Joined: Tue Oct 01, 2002 9:14 pm
- Location: Ontario, Oregon
- Contact:
Re: FOG Light Switch, using Blazer wiper switch???
Five relays.
Sent from my AT100 using Tapatalk 2
"Speed doesn't kill, suddenly becoming stationary does." - Richard Hammond
"Speed is just a matter of Money - How fast do YOU want to go?"-Mechanic from Mad Max-
If at first you don't succeed - Don't take up Skydiving! - ThunderII KE7CSK