Just thought somone might want to know that the light green wire is for the back-up lights
Back-up light wiring
Moderator: F9K9
-
HenryJ

- Admin K Elite

- Posts: 12706
- Joined: Tue Oct 01, 2002 9:14 pm
- Location: Ontario, Oregon
- Contact:
Back-up light wiring
I added an aux. back-up light.
Just thought somone might want to know that the light green wire is for the back-up lights
Just thought somone might want to know that the light green wire is for the back-up lights
"Speed doesn't kill, suddenly becoming stationary does." - Richard Hammond
"Speed is just a matter of Money - How fast do YOU want to go?"-Mechanic from Mad Max-
If at first you don't succeed - Don't take up Skydiving! - ThunderII KE7CSK

-
HenryJ
- Admin K Elite
- Posts: 12706
- Joined: Tue Oct 01, 2002 9:14 pm
- Location: Ontario, Oregon
- Contact:
I tapped it near the harness connector on the rear of the driverside frame rail, but yes the light green wire going to the tail lights.

BTW- that one hole I had left over after raising my hitch and adding recovery hooks worked pretty good for mounting the light It is just a small implement light, but works great.


BTW- that one hole I had left over after raising my hitch and adding recovery hooks worked pretty good for mounting the light
Last edited by HenryJ on Thu May 11, 2006 4:48 pm, edited 2 times in total.
"Speed doesn't kill, suddenly becoming stationary does." - Richard Hammond
"Speed is just a matter of Money - How fast do YOU want to go?"-Mechanic from Mad Max-
If at first you don't succeed - Don't take up Skydiving! - ThunderII KE7CSK
-
HenryJ
- Admin K Elite
- Posts: 12706
- Joined: Tue Oct 01, 2002 9:14 pm
- Location: Ontario, Oregon
- Contact:
If you are adding more than the small light that I added , a relay would be a good idea. It can be activated by the same wire that I used.
I would mount a relay inside the rear frame rail near the tail light wiring. Inside the left rear frame rail there is a white plastic connection. This is the tail lamp wiring.
You can add a maxi fuse to the engine compartment fuse box to energize the rear power distribution stud, then add a wire from there to the rear of your truck to power the lights. Attach this to the relay positive power source (#87)
Tap the light green wire. This is your positive back-up light wire attach it to relay "activate +"(#85)
Ground terminal #86
#30 is where you attach the positive feed for the lights.
Last edited by HenryJ on Sat Oct 09, 2004 5:35 pm, edited 1 time in total.
"Speed doesn't kill, suddenly becoming stationary does." - Richard Hammond
"Speed is just a matter of Money - How fast do YOU want to go?"-Mechanic from Mad Max-
If at first you don't succeed - Don't take up Skydiving! - ThunderII KE7CSK


Wow you really did paint your Boise springs...
I thought you Photoshoped them in these images just for illustration.

Sorry off topic.
Pete
I thought you Photoshoped them in these images just for illustration.
Sorry off topic.
Pete
[size=75][url=http://photobucket.com/albums/v179/retep910/S10/]2002 S10 Ext. Cab 4x4 Indigo Blue[/url]
Extang Black Max Tonneau, Rubber Bed Mat, Vent Visors, Bugflector II, SilverStar headlights, Dark Window Tint, Disabled DRL, Debadged, K&N Filter, Skid Plates, 1.25" Rear Wheel Spacers, Boise 3 aal kit, mild T-bar crank, Dueler A/T Revo[/size]
Extang Black Max Tonneau, Rubber Bed Mat, Vent Visors, Bugflector II, SilverStar headlights, Dark Window Tint, Disabled DRL, Debadged, K&N Filter, Skid Plates, 1.25" Rear Wheel Spacers, Boise 3 aal kit, mild T-bar crank, Dueler A/T Revo[/size]
-
HenryJ
- Admin K Elite
- Posts: 12706
- Joined: Tue Oct 01, 2002 9:14 pm
- Location: Ontario, Oregon
- Contact:
Yes,Retep wrote:Wow you really did paint your Boise springs...
Oh, the sacrifices that I make
"Speed doesn't kill, suddenly becoming stationary does." - Richard Hammond
"Speed is just a matter of Money - How fast do YOU want to go?"-Mechanic from Mad Max-
If at first you don't succeed - Don't take up Skydiving! - ThunderII KE7CSK
-
adrenalnjunky

- Crew Elite

- Posts: 895
- Joined: Sun Jul 27, 2003 11:32 am
- Location: West Monroe, Louisiana
- Contact:
Ahh I did this last year-- but I went one better, and did a dual relay setup. That way, the rear lights light up whenever the truck is in reverse, or when I flip a toggle switch I mounted in my overhead console.
The cool thing about that is that your truck doesn't have to be in reverse to activate the lights, like when loadin a trailer in the dark, or to illuminate an area behind the truck you're working in if that's the direction the truck happens to be facing. (Of course I would neeeeeever use it to get tailgaters to back off )
)
but one of my relays has bit the farm, so right now all I can do is get the lights to come on when I have both the switch on and the truck is in reverse. Gonna fix that tonight I think - I have a narrow, dark driveway with no streetlights around, and those lights help a lot.
The cool thing about that is that your truck doesn't have to be in reverse to activate the lights, like when loadin a trailer in the dark, or to illuminate an area behind the truck you're working in if that's the direction the truck happens to be facing. (Of course I would neeeeeever use it to get tailgaters to back off
but one of my relays has bit the farm, so right now all I can do is get the lights to come on when I have both the switch on and the truck is in reverse. Gonna fix that tonight I think - I have a narrow, dark driveway with no streetlights around, and those lights help a lot.
[size=75]Thanks, CHRIS
2000 S10 Blazer 4x4 4Dr. -- 2" PA BodyLift, Daystar Shackles, TB Crank, 1.75" Rear wheel spacers, Yakima roofrack, 30" BFG AT's.
1969 VW Bug -- airbagged and in pieces.
1962 VW Karmann ghia -- rusting over in the corner. "That's not a tool--that's a damn brick!"[/size]
2000 S10 Blazer 4x4 4Dr. -- 2" PA BodyLift, Daystar Shackles, TB Crank, 1.75" Rear wheel spacers, Yakima roofrack, 30" BFG AT's.
1969 VW Bug -- airbagged and in pieces.
1962 VW Karmann ghia -- rusting over in the corner. "That's not a tool--that's a damn brick!"[/size]
And of course I would never use such a setup on the person behind me with their high beams on either.adrenalnjunky wrote:Of course I would neeeeeever use it to get tailgaters to back off
Pete
[size=75][url=http://photobucket.com/albums/v179/retep910/S10/]2002 S10 Ext. Cab 4x4 Indigo Blue[/url]
Extang Black Max Tonneau, Rubber Bed Mat, Vent Visors, Bugflector II, SilverStar headlights, Dark Window Tint, Disabled DRL, Debadged, K&N Filter, Skid Plates, 1.25" Rear Wheel Spacers, Boise 3 aal kit, mild T-bar crank, Dueler A/T Revo[/size]
Extang Black Max Tonneau, Rubber Bed Mat, Vent Visors, Bugflector II, SilverStar headlights, Dark Window Tint, Disabled DRL, Debadged, K&N Filter, Skid Plates, 1.25" Rear Wheel Spacers, Boise 3 aal kit, mild T-bar crank, Dueler A/T Revo[/size]

-
camelott112

- Crew Elite
- Posts: 251
- Joined: Tue Aug 17, 2004 1:59 am
- Contact:
how hard do you think it would be to run the aux back lights to the top of a hard cover i just have an idea you can see it in the mod thread about a roofrack if your curious but i mean i havent done much wiring and if i do it ill need some help relay and all that is greek to me but i think this is gonna be killer soi want to do it
-
adrenalnjunky
- Crew Elite
- Posts: 895
- Joined: Sun Jul 27, 2003 11:32 am
- Location: West Monroe, Louisiana
- Contact:
not hard at all.
Many of us would be willing to help ya out and talk yout hrough it. I spent all night last ngiht re-wiring all my relays.
Had 1 relay out of 5 go bad, and it required that I completely re-wire everything.
(ok so it didn't really require it, but I get a lil #### about my wiring jobs, plus I wanted to move all the realys from the passenger side under the battery to the drivers side near the fusebox.)
[size=75]Thanks, CHRIS
2000 S10 Blazer 4x4 4Dr. -- 2" PA BodyLift, Daystar Shackles, TB Crank, 1.75" Rear wheel spacers, Yakima roofrack, 30" BFG AT's.
1969 VW Bug -- airbagged and in pieces.
1962 VW Karmann ghia -- rusting over in the corner. "That's not a tool--that's a damn brick!"[/size]
2000 S10 Blazer 4x4 4Dr. -- 2" PA BodyLift, Daystar Shackles, TB Crank, 1.75" Rear wheel spacers, Yakima roofrack, 30" BFG AT's.
1969 VW Bug -- airbagged and in pieces.
1962 VW Karmann ghia -- rusting over in the corner. "That's not a tool--that's a damn brick!"[/size]
-
camelott112
- Crew Elite
- Posts: 251
- Joined: Tue Aug 17, 2004 1:59 am
- Contact:

I want to add a light like HJ's but I want to be able to turn it on & off by a switch rather than having to be in reverse. Anyone know how I can run that? Where to get power from, etc.?
I just found out how difficult it is to hook & unhook a trailer at night without the extra light source.
I just found out how difficult it is to hook & unhook a trailer at night without the extra light source.
[size=75]"As I said before, I never repeat myself!"[/size]
-
Yellow Hammer

- Crew Elite
- Posts: 138
- Joined: Wed Nov 10, 2004 2:25 am
- Location: Dunedin, FL
- Contact:
I used the power straight from the battery. At first I had them set up like HenryJ but didn't like the fact that they were always on when in reverse so I installed a switch in the cab and ran the power from the battery instead of the back-up light wiring. I added a fuse and a relay for safety. I also had them mounted like f9k9 but ran into some clearance issues with them. I damn near ripped them off off-roading through a big rut. I removed them and placed them on top of my hi-lift bar that I made in the bed. This however does not light up the ground below your truck but shines it straight back above the tailgate. A friend of mine cut two holes on each side of his bumper in his ZR2, filed them smooth, and put door trim around the edge of the cut and mounted them there. It looks pretty good (almost factory) and I plan on putting another set there in the future. I'll see if I can get a pic from him to show you. I mounted three switches on the blank panel where the air bag switch goes for the standard and extra cab S10s (one for the Hella lights in front, one for the rear lights on the hi-lift bar, and one for future use). Below are some pics.


[size=75]2001 S-10 Crew Cab (white), 2" suspension lift (torsion bar crank & Daystar shackles), 2"BL, 31X10.50 BFG AT, 15X7 Cragar wheels (black), 1.25" rear wheel spacers, Hi-Lift jack with mount, rock sliders, Bilstein shocks, Westin light bar, Hella 500 lights, Trans cooler, GPS, CB, XM radio
Roll Tide!![/size]
Roll Tide!![/size]
-
Yellow Hammer
- Crew Elite
- Posts: 138
- Joined: Wed Nov 10, 2004 2:25 am
- Location: Dunedin, FL
- Contact:
Here is a pic of where I use to have them but I can guarantee that if you put them there and plan on doing some serious off-roading, they will get ripped off.

It's not a very good pic of the lights below the bumper but it's the only one I have before I moved them.
It's not a very good pic of the lights below the bumper but it's the only one I have before I moved them.
[size=75]2001 S-10 Crew Cab (white), 2" suspension lift (torsion bar crank & Daystar shackles), 2"BL, 31X10.50 BFG AT, 15X7 Cragar wheels (black), 1.25" rear wheel spacers, Hi-Lift jack with mount, rock sliders, Bilstein shocks, Westin light bar, Hella 500 lights, Trans cooler, GPS, CB, XM radio
Roll Tide!![/size]
Roll Tide!![/size]
Thanks, Hammer. I appreciate your help. I like that idea of putting them in the bumper! That sounds cool! IF I could pull it off! A pic of that would be great!
So, do I need a relay if I'm just running a light like HJ's??? Again, I'm wanting a constant hot source. Not just when the back up lights are on. And if I do need a relay, how would I wire it that way???
Sorry, I am really a dunce when it comes to electical wiring.
So, do I need a relay if I'm just running a light like HJ's??? Again, I'm wanting a constant hot source. Not just when the back up lights are on. And if I do need a relay, how would I wire it that way???
Sorry, I am really a dunce when it comes to electical wiring.
[size=75]"As I said before, I never repeat myself!"[/size]
-
HenryJ
- Admin K Elite
- Posts: 12706
- Joined: Tue Oct 01, 2002 9:14 pm
- Location: Ontario, Oregon
- Contact:
In this case I would add a relay so that the wire for the lighting is not hot all the time and it can be activated by the negative terminal , requiring only one wire from the switch that is not hot.Pauleo wrote:... do I need a relay if I'm just running a light like HJ's??? ... I'm wanting a constant hot source....if I do need a relay, how would I wire it...??
If you want to use some of the factory wiring behind the little blank panel check out this thread - Wiring question
Ground one side of the switch, run the other to the relay mounted under the hood here-

And attach it to terminal #86. This will activate the relay by grounding it. That way you do not have a hot wire running through the firewall.
Power for the relay can be brought from the stud in the electrical center (add the appropriate size fuse) - Adding an accessory power source You can jumper terminals #85 and #87 from your power source. Now run a wire from terminal #30 to the light at the back. I would probably run 14 ga. wire. That way you can add a couple lights if you want to.
That is all you need to do
Last edited by HenryJ on Wed Sep 12, 2007 4:17 pm, edited 1 time in total.
"Speed doesn't kill, suddenly becoming stationary does." - Richard Hammond
"Speed is just a matter of Money - How fast do YOU want to go?"-Mechanic from Mad Max-
If at first you don't succeed - Don't take up Skydiving! - ThunderII KE7CSK
Where did you find those 3 switches? Were they mounted in the bracket like that or did you customize it?
2003 S10 Crew 4x4
Mods: 1.5" Front Spacers - GM Valley Hitch - WeatherTech WeatherFlectors - Bilstein Shocks - Boise Spring works 2" rear spring kit - Truxedo Toneau Cover - PopLock tailgate lock - Hypertech Tuning - SKIDS Flares - 2" Body Lift - ZR2 Axle upgrade
Mods: 1.5" Front Spacers - GM Valley Hitch - WeatherTech WeatherFlectors - Bilstein Shocks - Boise Spring works 2" rear spring kit - Truxedo Toneau Cover - PopLock tailgate lock - Hypertech Tuning - SKIDS Flares - 2" Body Lift - ZR2 Axle upgrade
-
Yellow Hammer
- Crew Elite
- Posts: 138
- Joined: Wed Nov 10, 2004 2:25 am
- Location: Dunedin, FL
- Contact:
I got the switches at Advanced Auto Parts. It's a pretty common switch. The blank panel is already there in your truck as long as you have a CC. The standard cabs and extended cabs have the air bag shut-off switch in that spot. I just drilled three holes in that blank panel and mounted the switches. It was real easy.Where did you find those 3 switches? Were they mounted in the bracket like that or did you customize it?
[size=75]2001 S-10 Crew Cab (white), 2" suspension lift (torsion bar crank & Daystar shackles), 2"BL, 31X10.50 BFG AT, 15X7 Cragar wheels (black), 1.25" rear wheel spacers, Hi-Lift jack with mount, rock sliders, Bilstein shocks, Westin light bar, Hella 500 lights, Trans cooler, GPS, CB, XM radio
Roll Tide!![/size]
Roll Tide!![/size]
-
HenryJ
- Admin K Elite
- Posts: 12706
- Joined: Tue Oct 01, 2002 9:14 pm
- Location: Ontario, Oregon
- Contact:
The utilities have the rear wiper and hatch switch mounted there.Yellow Hammer wrote:...The blank panel is already there in your truck as long as you have a CC. The standard cabs and extended cabs have the air bag shut-off switch in that spot...
Our crew cabs have the utility wiring harness so the wiring is back there for the wiper and hatch release.
Trucks without an option to put children in a back seat have the air bag disconnect switch.
Last edited by HenryJ on Fri Apr 15, 2005 4:01 am, edited 1 time in total.
"Speed doesn't kill, suddenly becoming stationary does." - Richard Hammond
"Speed is just a matter of Money - How fast do YOU want to go?"-Mechanic from Mad Max-
If at first you don't succeed - Don't take up Skydiving! - ThunderII KE7CSK
-
Yellow Hammer
- Crew Elite
- Posts: 138
- Joined: Wed Nov 10, 2004 2:25 am
- Location: Dunedin, FL
- Contact:
ludwis, if you noticed in my pic with the switches, they have yellow LEDs. I chose those because I wanted to have some kind of indication that the lights were on in case I forgot about them. You can get them without LEDs if you want or in different color LEDs. However, I don't suggest the blue LEDs. They charge a fortune for blue LEDs since they are relatively new. I think the first blue LED came out when the Playstation 2 was revealed. Anyway, not only are they expensive but they are about twice as bright as the rest and they are really annoying when driving at night and it shines right in your face (even if you turn the switch 180 degrees). I bought one when I first put these switches in and it cost me $15. The other LED colors were only about $7 each and without LEDs were about $5 each.
[size=75]2001 S-10 Crew Cab (white), 2" suspension lift (torsion bar crank & Daystar shackles), 2"BL, 31X10.50 BFG AT, 15X7 Cragar wheels (black), 1.25" rear wheel spacers, Hi-Lift jack with mount, rock sliders, Bilstein shocks, Westin light bar, Hella 500 lights, Trans cooler, GPS, CB, XM radio
Roll Tide!![/size]
Roll Tide!![/size]
-
Yellow Hammer
- Crew Elite
- Posts: 138
- Joined: Wed Nov 10, 2004 2:25 am
- Location: Dunedin, FL
- Contact:
I couldn't get a pic of my friends ZR2 but I did get one of another friend's Tacoma.Pauleo wrote:IF I could pull it off! A pic of that would be great!

It's a little hard to see but you get the idea. I'll see if I can get him to take a close-up. His only has one light to the left of his license plate but I plan on putting one on each side.
Last edited by Yellow Hammer on Fri Apr 15, 2005 6:47 am, edited 1 time in total.
[size=75]2001 S-10 Crew Cab (white), 2" suspension lift (torsion bar crank & Daystar shackles), 2"BL, 31X10.50 BFG AT, 15X7 Cragar wheels (black), 1.25" rear wheel spacers, Hi-Lift jack with mount, rock sliders, Bilstein shocks, Westin light bar, Hella 500 lights, Trans cooler, GPS, CB, XM radio
Roll Tide!![/size]
Roll Tide!![/size]
-
Yellow Hammer
- Crew Elite
- Posts: 138
- Joined: Wed Nov 10, 2004 2:25 am
- Location: Dunedin, FL
- Contact:
I cropped the pic so you could get a better look.

[size=75]2001 S-10 Crew Cab (white), 2" suspension lift (torsion bar crank & Daystar shackles), 2"BL, 31X10.50 BFG AT, 15X7 Cragar wheels (black), 1.25" rear wheel spacers, Hi-Lift jack with mount, rock sliders, Bilstein shocks, Westin light bar, Hella 500 lights, Trans cooler, GPS, CB, XM radio
Roll Tide!![/size]
Roll Tide!![/size]
-
Yellow Hammer
- Crew Elite
- Posts: 138
- Joined: Wed Nov 10, 2004 2:25 am
- Location: Dunedin, FL
- Contact:
By the way. If you do it this way by cutting a hole in the bumper, you are limited to aiming the lights where you want them. Left to right shouldn't be a problem if you get floods but up and down is pretty much set depending on how you mount your bracket behind the bumper.
[size=75]2001 S-10 Crew Cab (white), 2" suspension lift (torsion bar crank & Daystar shackles), 2"BL, 31X10.50 BFG AT, 15X7 Cragar wheels (black), 1.25" rear wheel spacers, Hi-Lift jack with mount, rock sliders, Bilstein shocks, Westin light bar, Hella 500 lights, Trans cooler, GPS, CB, XM radio
Roll Tide!![/size]
Roll Tide!![/size]
-
Yellow Hammer
- Crew Elite
- Posts: 138
- Joined: Wed Nov 10, 2004 2:25 am
- Location: Dunedin, FL
- Contact:
He used an air grinder with a cut-out wheel.
[size=75]2001 S-10 Crew Cab (white), 2" suspension lift (torsion bar crank & Daystar shackles), 2"BL, 31X10.50 BFG AT, 15X7 Cragar wheels (black), 1.25" rear wheel spacers, Hi-Lift jack with mount, rock sliders, Bilstein shocks, Westin light bar, Hella 500 lights, Trans cooler, GPS, CB, XM radio
Roll Tide!![/size]
Roll Tide!![/size]
Anyway, thanks for all the info! I'm on it!
[size=75]"As I said before, I never repeat myself!"[/size]
-
Yellow Hammer
- Crew Elite
- Posts: 138
- Joined: Wed Nov 10, 2004 2:25 am
- Location: Dunedin, FL
- Contact:
Yeah, I think a round hole would be a little tougher to cut. I think I'll stick with the rectangle ones. I think there are some pretty bright lights out there that are round and small. Do you have a chrome bumper? If so, clean up the cut real good and touch it up with something or it will rust.Pauleo wrote:Cool! I think that's going to be my next mod! It would look good using round lights, but I'll bet that would be a PITA to cut! Unless I found some lights small enough to use a hole saw. Maybe that's an idea!
[size=75]2001 S-10 Crew Cab (white), 2" suspension lift (torsion bar crank & Daystar shackles), 2"BL, 31X10.50 BFG AT, 15X7 Cragar wheels (black), 1.25" rear wheel spacers, Hi-Lift jack with mount, rock sliders, Bilstein shocks, Westin light bar, Hella 500 lights, Trans cooler, GPS, CB, XM radio
Roll Tide!![/size]
Roll Tide!![/size]

Thanks for the great info in this thread. I have spent a lot of time lying under my CC trying to find a place to mount auxiliary back-up lights and the small rounds mounted in the bumper using a hole saw and finishing it off with door trim sounds like the ticket. I am a little uncertain regarding the wiring. I would like the lights to come on when I shift into reverse and understand the green wire controls the factory back-ups, but where does the relay fit into the process? Do I need a separate power source from the green wire? If so do I go back to the battery or the the fuse block under the hood? HELP!!!
Many Thanks!
Many Thanks!
-
HenryJ
- Admin K Elite
- Posts: 12706
- Joined: Tue Oct 01, 2002 9:14 pm
- Location: Ontario, Oregon
- Contact:
I would use the green wire to activate a relay. Run a wire from from the accessory power stud in the electrical power distribution box (fuse box) under the hood to power the lights.Cajun wrote:...I would like the lights to come on when I shift into reverse and understand the green wire controls the factory back-ups, but where does the relay fit into the process? Do I need a separate power source from the green wire? If so do I go back to the battery or the the fuse block under the hood?
Should be a pretty good way to go.
You may even be able to mount the relay under the hood and intercept the back-up wiring at the power distribution center. I'll take a look at that tomorrow.
Be sure to let us know how it works out, and some pictures too would be nice
"Speed doesn't kill, suddenly becoming stationary does." - Richard Hammond
"Speed is just a matter of Money - How fast do YOU want to go?"-Mechanic from Mad Max-
If at first you don't succeed - Don't take up Skydiving! - ThunderII KE7CSK
-
HenryJ
- Admin K Elite
- Posts: 12706
- Joined: Tue Oct 01, 2002 9:14 pm
- Location: Ontario, Oregon
- Contact:
I went out and looked. There is a fuse for the back-up lights (VEH BU) in the upper left quadrant. This becomes "hot" when the back-up lights are activated.
It would take some effort, but tapping the wire coming from this fuse would be a great way to activate your relay. Then your relay is under the hood and better protected from the elements. It would be close to the accessory power stud, run one wire back to your lights and you're set.
It would take some effort, but tapping the wire coming from this fuse would be a great way to activate your relay. Then your relay is under the hood and better protected from the elements. It would be close to the accessory power stud, run one wire back to your lights and you're set.
"Speed doesn't kill, suddenly becoming stationary does." - Richard Hammond
"Speed is just a matter of Money - How fast do YOU want to go?"-Mechanic from Mad Max-
If at first you don't succeed - Don't take up Skydiving! - ThunderII KE7CSK
Thanks for the response Henry!I found the BU fuse that you mentioned above. I have been shopping for lights and the usual foot dragging but am ready to get started this weekend. I have two more questions, stupid ones I'm sure, where is the accessory power stud and what does it look like? Where do I get a relay and how do I determine what amp relay is required? Thanks for your guidance.
Craig
Craig
-
adrenalnjunky
- Crew Elite
- Posts: 895
- Joined: Sun Jul 27, 2003 11:32 am
- Location: West Monroe, Louisiana
- Contact:
Standard 30 amp relay from the off-road/driving light section of your local auto parts store will be fine for this.
For adding/finding the accessory power stud read here:
http://www.s-10crewcab.com/phpBB2/viewtopic.php?t=2184
For adding/finding the accessory power stud read here:
http://www.s-10crewcab.com/phpBB2/viewtopic.php?t=2184
[size=75]Thanks, CHRIS
2000 S10 Blazer 4x4 4Dr. -- 2" PA BodyLift, Daystar Shackles, TB Crank, 1.75" Rear wheel spacers, Yakima roofrack, 30" BFG AT's.
1969 VW Bug -- airbagged and in pieces.
1962 VW Karmann ghia -- rusting over in the corner. "That's not a tool--that's a damn brick!"[/size]
2000 S10 Blazer 4x4 4Dr. -- 2" PA BodyLift, Daystar Shackles, TB Crank, 1.75" Rear wheel spacers, Yakima roofrack, 30" BFG AT's.
1969 VW Bug -- airbagged and in pieces.
1962 VW Karmann ghia -- rusting over in the corner. "That's not a tool--that's a damn brick!"[/size]
Thanks West Monroe! All sounds perfectly clear now.
Say, you wouldn't happen to be a Tiger fan? The Geaux type of tiger. I'm orginally from Pointe Coupee Parish and spent six glorious years in Baton Rouge at LSU. I brought my girls down over Christmas to visit Mike in his new digs.
Thanks again for your help.
Craig Chenevert
Say, you wouldn't happen to be a Tiger fan? The Geaux type of tiger. I'm orginally from Pointe Coupee Parish and spent six glorious years in Baton Rouge at LSU. I brought my girls down over Christmas to visit Mike in his new digs.
Thanks again for your help.
Craig Chenevert
-
adrenalnjunky
- Crew Elite
- Posts: 895
- Joined: Sun Jul 27, 2003 11:32 am
- Location: West Monroe, Louisiana
- Contact:
Nah - I'm anorthern Louisiana type of guy - not really a big college football follower, - West Monroe is on Interstate 20 between Shreveport and Jackson, Miss.
[size=75]Thanks, CHRIS
2000 S10 Blazer 4x4 4Dr. -- 2" PA BodyLift, Daystar Shackles, TB Crank, 1.75" Rear wheel spacers, Yakima roofrack, 30" BFG AT's.
1969 VW Bug -- airbagged and in pieces.
1962 VW Karmann ghia -- rusting over in the corner. "That's not a tool--that's a damn brick!"[/size]
2000 S10 Blazer 4x4 4Dr. -- 2" PA BodyLift, Daystar Shackles, TB Crank, 1.75" Rear wheel spacers, Yakima roofrack, 30" BFG AT's.
1969 VW Bug -- airbagged and in pieces.
1962 VW Karmann ghia -- rusting over in the corner. "That's not a tool--that's a damn brick!"[/size]
-
F9K9
- Mod K Elite

- Posts: 6183
- Joined: Sun May 30, 2004 12:26 pm
- Location: London, Kentucky, United States
Ok, I have nothing but trouble with these aux back-up lights.

I am running some serious tint (not limo, but, illegal so, I need aux lighting) and have had "beau coup" water condensation problems, grounds going bad and relays going out. I have used a lot of dielectric grease. Used heat shrink and liguid tape on connections and sealed the housings with silicome.
I am looking for new compact fog lights and have looked at those offered from:
Hella, PIAA, sold at Wallyworld, Kmart, O'rielly's, Advance. Napa and Advance and KChilite.
I am at the point, price is not a concern. The marketed KC back-up lights are msrp at $101+. I have found them for $66 but, they are large (2"x6") and composite which means "plastic".

My current china made ones have survived some serious mudholes where various parts of my truck were hit and they survived.
Do they make bullet proof lights or should I continue to troubleshoot the cheap lights and replace the $20 suckers biannually?
I am running some serious tint (not limo, but, illegal so, I need aux lighting) and have had "beau coup" water condensation problems, grounds going bad and relays going out. I have used a lot of dielectric grease. Used heat shrink and liguid tape on connections and sealed the housings with silicome.
I am looking for new compact fog lights and have looked at those offered from:
Hella, PIAA, sold at Wallyworld, Kmart, O'rielly's, Advance. Napa and Advance and KChilite.
I am at the point, price is not a concern. The marketed KC back-up lights are msrp at $101+. I have found them for $66 but, they are large (2"x6") and composite which means "plastic".
My current china made ones have survived some serious mudholes where various parts of my truck were hit and they survived.
Do they make bullet proof lights or should I continue to troubleshoot the cheap lights and replace the $20 suckers biannually?
[size=75][b]"For those who have fought for it, [i][color=red]FR[/color][color=white]EE[/color][color=blue]DOM[/color][/i] has a taste that the protected will never know."
[url=http://www.naxja.org/forum/showthread.php?t=73349]GUIDE TO SEARCHING. [i] (Some of the forum software is different but, it has helped me a lot.)[/i][/url][/b]
[b]"Those who don't know history are destined to repeat it." Edmund Burke[/b][/size]
[url=http://www.naxja.org/forum/showthread.php?t=73349]GUIDE TO SEARCHING. [i] (Some of the forum software is different but, it has helped me a lot.)[/i][/url][/b]
[b]"Those who don't know history are destined to repeat it." Edmund Burke[/b][/size]
-
HenryJ
- Admin K Elite
- Posts: 12706
- Joined: Tue Oct 01, 2002 9:14 pm
- Location: Ontario, Oregon
- Contact:
Tractor supply rubber housing lights with a integrated bulb reflector.
Less than $10 each. You choose flood or spot.
Less than $10 each. You choose flood or spot.
"Speed doesn't kill, suddenly becoming stationary does." - Richard Hammond
"Speed is just a matter of Money - How fast do YOU want to go?"-Mechanic from Mad Max-
If at first you don't succeed - Don't take up Skydiving! - ThunderII KE7CSK
-
F9K9
- Mod K Elite
- Posts: 6183
- Joined: Sun May 30, 2004 12:26 pm
- Location: London, Kentucky, United States
I have looked long and hard at those, Brule. I am concerned with the departure angle and their size for mounting them where I currently have mine located at now. There is a world of space where, my spare used to be but, I am mulling things over for now. I do know (for a changeHenryJ wrote:Tractor supply rubber housing lights with a integrated bulb reflector.
Less than $10 each. You choose flood or spot.
The cheap lights have done really well in their current location.
[size=75][b]"For those who have fought for it, [i][color=red]FR[/color][color=white]EE[/color][color=blue]DOM[/color][/i] has a taste that the protected will never know."
[url=http://www.naxja.org/forum/showthread.php?t=73349]GUIDE TO SEARCHING. [i] (Some of the forum software is different but, it has helped me a lot.)[/i][/url][/b]
[b]"Those who don't know history are destined to repeat it." Edmund Burke[/b][/size]
[url=http://www.naxja.org/forum/showthread.php?t=73349]GUIDE TO SEARCHING. [i] (Some of the forum software is different but, it has helped me a lot.)[/i][/url][/b]
[b]"Those who don't know history are destined to repeat it." Edmund Burke[/b][/size]
-
HenryJ
- Admin K Elite
- Posts: 12706
- Joined: Tue Oct 01, 2002 9:14 pm
- Location: Ontario, Oregon
- Contact:
My one light plus the 50w halogen back up light are ok. Not daylight , and not as much as I had on my old truck. If I need some serious light I attach my winch and the remote controlled lights to the rear.
How do you feel about drilling 4" holes in the rear bumper and inserting a pair of the clear sealed truck lights? Those rubber grommet mounted lights. That might be an option.
How do you feel about drilling 4" holes in the rear bumper and inserting a pair of the clear sealed truck lights? Those rubber grommet mounted lights. That might be an option.
"Speed doesn't kill, suddenly becoming stationary does." - Richard Hammond
"Speed is just a matter of Money - How fast do YOU want to go?"-Mechanic from Mad Max-
If at first you don't succeed - Don't take up Skydiving! - ThunderII KE7CSK
-
F9K9
- Mod K Elite
- Posts: 6183
- Joined: Sun May 30, 2004 12:26 pm
- Location: London, Kentucky, United States
I have no qualms about drilling anything at this point, Brule. Do you have a photo of the light and the additional tools required to do this? Someone recently installed nifty lights in the bumper that I will eventually be able to locate again 
[size=75][b]"For those who have fought for it, [i][color=red]FR[/color][color=white]EE[/color][color=blue]DOM[/color][/i] has a taste that the protected will never know."
[url=http://www.naxja.org/forum/showthread.php?t=73349]GUIDE TO SEARCHING. [i] (Some of the forum software is different but, it has helped me a lot.)[/i][/url][/b]
[b]"Those who don't know history are destined to repeat it." Edmund Burke[/b][/size]
[url=http://www.naxja.org/forum/showthread.php?t=73349]GUIDE TO SEARCHING. [i] (Some of the forum software is different but, it has helped me a lot.)[/i][/url][/b]
[b]"Those who don't know history are destined to repeat it." Edmund Burke[/b][/size]
-
F9K9
- Mod K Elite
- Posts: 6183
- Joined: Sun May 30, 2004 12:26 pm
- Location: London, Kentucky, United States
Nifty "inside the Bumper" lights will still need to be weather resistant and so the original search has to continue.
[size=75][b]"For those who have fought for it, [i][color=red]FR[/color][color=white]EE[/color][color=blue]DOM[/color][/i] has a taste that the protected will never know."
[url=http://www.naxja.org/forum/showthread.php?t=73349]GUIDE TO SEARCHING. [i] (Some of the forum software is different but, it has helped me a lot.)[/i][/url][/b]
[b]"Those who don't know history are destined to repeat it." Edmund Burke[/b][/size]
[url=http://www.naxja.org/forum/showthread.php?t=73349]GUIDE TO SEARCHING. [i] (Some of the forum software is different but, it has helped me a lot.)[/i][/url][/b]
[b]"Those who don't know history are destined to repeat it." Edmund Burke[/b][/size]
-
HenryJ
- Admin K Elite
- Posts: 12706
- Joined: Tue Oct 01, 2002 9:14 pm
- Location: Ontario, Oregon
- Contact:
I think there were a couple rigs set up that way. I am not so sure that Roger of ZR2USA has them.
Seems like there were a couple others as well from ZR2.com Maybe cknaffle, ChrisZR2 (lifesaver elite)?
Might be worth seeing if Jigg or Muslhed remember who?
The truck lights are also a sealed unit.
A 4" holesaw would be needed.
Seems like there were a couple others as well from ZR2.com Maybe cknaffle, ChrisZR2 (lifesaver elite)?
Might be worth seeing if Jigg or Muslhed remember who?
The truck lights are also a sealed unit.
A 4" holesaw would be needed.
"Speed doesn't kill, suddenly becoming stationary does." - Richard Hammond
"Speed is just a matter of Money - How fast do YOU want to go?"-Mechanic from Mad Max-
If at first you don't succeed - Don't take up Skydiving! - ThunderII KE7CSK
-
F9K9
- Mod K Elite
- Posts: 6183
- Joined: Sun May 30, 2004 12:26 pm
- Location: London, Kentucky, United States
They may have them as well,. We had a member here that had cut rectangular holes in the bumper and it was definfinitely within the last yr or so. The mounting location is not what I am getting at (although it is very important) but, a light that is weather resistant and compact.
A couple like yours might very well do the trick.
BTW, what type of hole saw are we talking about?
Recomendations?
Thanks, in advance.
A couple like yours might very well do the trick.
BTW, what type of hole saw are we talking about?
Recomendations?
Thanks, in advance.
[size=75][b]"For those who have fought for it, [i][color=red]FR[/color][color=white]EE[/color][color=blue]DOM[/color][/i] has a taste that the protected will never know."
[url=http://www.naxja.org/forum/showthread.php?t=73349]GUIDE TO SEARCHING. [i] (Some of the forum software is different but, it has helped me a lot.)[/i][/url][/b]
[b]"Those who don't know history are destined to repeat it." Edmund Burke[/b][/size]
[url=http://www.naxja.org/forum/showthread.php?t=73349]GUIDE TO SEARCHING. [i] (Some of the forum software is different but, it has helped me a lot.)[/i][/url][/b]
[b]"Those who don't know history are destined to repeat it." Edmund Burke[/b][/size]
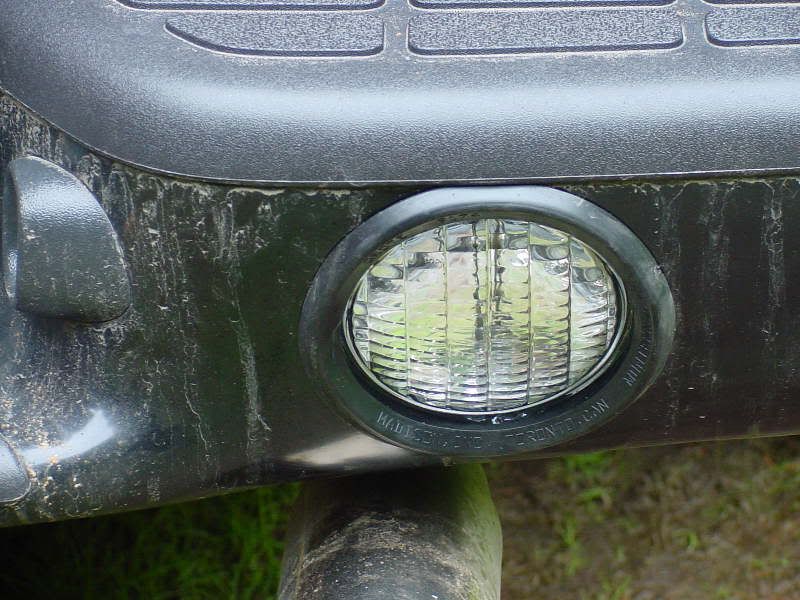
I think thees might be the back-up lights that you are rememberingf9k9 wrote:Nifty "inside the Bumper" lights

These have been installed almost one year with no trouble. The lights themselves are cheap Walmart driving lights that are pretty well sealed. I think the key is to mount the relay under the hood and out of the weather and winter road salt. I actually have two sets of relays connected to these lights, one activated by the stock back-up light circuit that is energized by shifting into reverse and another activated by a dash switch. the later I used for extra light camping and tail gaters.
Cutting the holes are easier than you might think. I first made a card board template of the rectangular hole with 1" radiused corners with punch marks in the center of the four radiuses. Tape the template in place on the bumper and using a punch mark the center of the 1" holes. Next using a good quality 1" hole saw made to cut steel drill the four corners, then using a steel blade in a jig saw cut out the remaining steel between the four 1" hole. Finish the edges with a file , paint the freshly cut steel edges and finish with a piece of split vac. hose.
Let me know if you have any further questions.
Last edited by Cajun on Wed Oct 25, 2006 3:56 am, edited 1 time in total.
[size=75]03 ZR5 Crew Cab[/size]
-
F9K9
- Mod K Elite
- Posts: 6183
- Joined: Sun May 30, 2004 12:26 pm
- Location: London, Kentucky, United States
That's them!!!!!!!! Have you had any problems at all?
[size=75][b]"For those who have fought for it, [i][color=red]FR[/color][color=white]EE[/color][color=blue]DOM[/color][/i] has a taste that the protected will never know."
[url=http://www.naxja.org/forum/showthread.php?t=73349]GUIDE TO SEARCHING. [i] (Some of the forum software is different but, it has helped me a lot.)[/i][/url][/b]
[b]"Those who don't know history are destined to repeat it." Edmund Burke[/b][/size]
[url=http://www.naxja.org/forum/showthread.php?t=73349]GUIDE TO SEARCHING. [i] (Some of the forum software is different but, it has helped me a lot.)[/i][/url][/b]
[b]"Those who don't know history are destined to repeat it." Edmund Burke[/b][/size]


Any chance of seeing how they are mounted on the inside? I'd like to do this as well.Cajun wrote:I think thees might be the back-up lights that you are rememberingf9k9 wrote:Nifty "inside the Bumper" lights
These have been installed almost one year with no trouble. The lights themselves are cheap Walmart driving lights that are pretty well sealed. I think the key is to mount the relay under the hood and out of the weather and winter road salt. I actually have two sets of relays connected to these lights, one activated by the stock back-up light circuit that is energized by shifting into reverse and another activated by a dash switch. the later I used for extra light camping and tail gaters.
Cutting the holes are easier than you might think. I first made a card board template of the rectangular hole with 1" radiused corners with punch marks in the center of the four radiuses. Tape the template in place on the bumper and using a punch mark the center of the 1" holes. Next using a good quality 1" hole saw made to cut steel drill the four corners, then using a steel blade in a jig saw cut out the remaining steel between the four 1" hole. Finish the edges with a file , paint the freshly cut steel edges and finish with a piece of split vac. hose.
Let me know if you have any further questions.
[size=75][url=http://www.zr2usa.com/members.php?id=974]"Maxine"[/url]- K&N FIPK, Gibson Cat-Back, Knaffle Shackles and Receivers, Optima Red Top, Knaffle Sliders, etc.
I break at least 2 Federal Laws per day.[/size]
I break at least 2 Federal Laws per day.[/size]
I mounted the lights to a piece of 5/4" treated wood painted black and cut slightly shallower than the depth of the bumper. Next drill two to four small holes through the bottom of the bumper on each side for S.S. wood screws to mount the wood block/back-up light assembly to the bumper. Then just place the assembly on the inside of the bumper, adjust the position of the light as needed for best spread, clamp the block in place and drive home the S.S. screws. A quick coat or two of black paint will help the new screws blend in and you are off.
[size=75]03 ZR5 Crew Cab[/size]

-
HenryJ
- Admin K Elite
- Posts: 12706
- Joined: Tue Oct 01, 2002 9:14 pm
- Location: Ontario, Oregon
- Contact:
Here is one of the installs I remember- Danimal_ZR bumper:
ZR2.com thread
ZR2.com thread
Danimal_ZR wrote:...i got a hole saw and here ya are.. I went with the glass sealed beam lights because i have had the plastic ones on my log trucks and they seem to scratch much to easy and not as bright... these seem to be much better than the cheaper ones i had before.. the put out a brighter white light than the others.. Much more defined.. My only tip would be (with any color you use) spring for the glass sealed beams instead of the plastic, you will be much happier... If any one wants the part #'s i will get them today.... The rubber gromets and sealed beam lights are " GROTE " brand.
Gromet PN# 91740
You have 2 choices for blubs...Bulb # 4411 Par 36 3,000 C.P. 12.8V. - 2.93 AMP Or
Bulb # H7606 Par 36 1,000 C.P .12.8V. - 2.93 AMP
I used a 4 1/4" hole saw.... But i did have to use a die grinder... You could use the next size up.. But i wanted to insure a tight fit...Grote website
"Speed doesn't kill, suddenly becoming stationary does." - Richard Hammond
"Speed is just a matter of Money - How fast do YOU want to go?"-Mechanic from Mad Max-
If at first you don't succeed - Don't take up Skydiving! - ThunderII KE7CSK
-
F9K9
- Mod K Elite
- Posts: 6183
- Joined: Sun May 30, 2004 12:26 pm
- Location: London, Kentucky, United States
Brule, Danimal's is a very good option. I like them. I tooled around during lunch today and checked out Tractor Supply but. was unimpressed. I have abandoned the "below bumper" location completely. Danimal's looks sweet but, definitely too labor and tool intensive. Currently, I am leaning towards your location but, with bullet proof lights. The holes are there since, I raised the hitch after my BL.
The engine bay location for a relay is the way to go and I wish I had done that. The engine bay is not reliable as my offroad lighting relays can attest to but, has to be better than on the inner frame.
The engine bay location for a relay is the way to go and I wish I had done that. The engine bay is not reliable as my offroad lighting relays can attest to but, has to be better than on the inner frame.
[size=75][b]"For those who have fought for it, [i][color=red]FR[/color][color=white]EE[/color][color=blue]DOM[/color][/i] has a taste that the protected will never know."
[url=http://www.naxja.org/forum/showthread.php?t=73349]GUIDE TO SEARCHING. [i] (Some of the forum software is different but, it has helped me a lot.)[/i][/url][/b]
[b]"Those who don't know history are destined to repeat it." Edmund Burke[/b][/size]
[url=http://www.naxja.org/forum/showthread.php?t=73349]GUIDE TO SEARCHING. [i] (Some of the forum software is different but, it has helped me a lot.)[/i][/url][/b]
[b]"Those who don't know history are destined to repeat it." Edmund Burke[/b][/size]
-
HenryJ
- Admin K Elite
- Posts: 12706
- Joined: Tue Oct 01, 2002 9:14 pm
- Location: Ontario, Oregon
- Contact:
Keep in mind that the drivers side is all you really need most of the time. If your window tint is really dark, the passenger side mirror doesn't do much for you when it is dark outside.
If you are down to one lamp and the wattage is low enough, tapping the wiring for that light and not using a relay may work. If the draw is too much you pop the fuse. Mine have been working fine thus far.
If you are down to one lamp and the wattage is low enough, tapping the wiring for that light and not using a relay may work. If the draw is too much you pop the fuse. Mine have been working fine thus far.
"Speed doesn't kill, suddenly becoming stationary does." - Richard Hammond
"Speed is just a matter of Money - How fast do YOU want to go?"-Mechanic from Mad Max-
If at first you don't succeed - Don't take up Skydiving! - ThunderII KE7CSK
-
F9K9
- Mod K Elite
- Posts: 6183
- Joined: Sun May 30, 2004 12:26 pm
- Location: London, Kentucky, United States
A very good point, Brule. I may try one sans relay and see if, the lighting is sufficient. I just need to locate a light that satisfies my requirements. I saw some round ATV lights somewhere in my search that may do the trick.
[size=75][b]"For those who have fought for it, [i][color=red]FR[/color][color=white]EE[/color][color=blue]DOM[/color][/i] has a taste that the protected will never know."
[url=http://www.naxja.org/forum/showthread.php?t=73349]GUIDE TO SEARCHING. [i] (Some of the forum software is different but, it has helped me a lot.)[/i][/url][/b]
[b]"Those who don't know history are destined to repeat it." Edmund Burke[/b][/size]
[url=http://www.naxja.org/forum/showthread.php?t=73349]GUIDE TO SEARCHING. [i] (Some of the forum software is different but, it has helped me a lot.)[/i][/url][/b]
[b]"Those who don't know history are destined to repeat it." Edmund Burke[/b][/size]
What do you think about These
[size=75]2001 S-10 Crew , A.R.E Cap, Limo tint windows, Halogen Back up lights. Bilstein Shocks, 1.5 Rear Spacers, Summit Rear Diff Cover Clear Bumper Lights, Carbon Altezza Tail Lights, Billet Grill. SS Step Bars. GM full front bra. ,,, GM Quote concerning the gurgling heater core " They all sound like that"[/size]
-
F9K9
- Mod K Elite
- Posts: 6183
- Joined: Sun May 30, 2004 12:26 pm
- Location: London, Kentucky, United States
Other than the adapters that plug into existing wiring, I think they are the same. I believe mine are Pilots.BADs Crew wrote:What do you think about These
I appreciate the effort though.
[size=75][b]"For those who have fought for it, [i][color=red]FR[/color][color=white]EE[/color][color=blue]DOM[/color][/i] has a taste that the protected will never know."
[url=http://www.naxja.org/forum/showthread.php?t=73349]GUIDE TO SEARCHING. [i] (Some of the forum software is different but, it has helped me a lot.)[/i][/url][/b]
[b]"Those who don't know history are destined to repeat it." Edmund Burke[/b][/size]
[url=http://www.naxja.org/forum/showthread.php?t=73349]GUIDE TO SEARCHING. [i] (Some of the forum software is different but, it has helped me a lot.)[/i][/url][/b]
[b]"Those who don't know history are destined to repeat it." Edmund Burke[/b][/size]
Here is a set for a Hummer
[size=75]2001 S-10 Crew , A.R.E Cap, Limo tint windows, Halogen Back up lights. Bilstein Shocks, 1.5 Rear Spacers, Summit Rear Diff Cover Clear Bumper Lights, Carbon Altezza Tail Lights, Billet Grill. SS Step Bars. GM full front bra. ,,, GM Quote concerning the gurgling heater core " They all sound like that"[/size]
-
F9K9
- Mod K Elite
- Posts: 6183
- Joined: Sun May 30, 2004 12:26 pm
- Location: London, Kentucky, United States
Cool but, now you are exceeding the KC brand that are $100+ msrp and the KC's that I found at approx $66.BADs Crew wrote:Here is a set for a Hummer
[size=75][b]"For those who have fought for it, [i][color=red]FR[/color][color=white]EE[/color][color=blue]DOM[/color][/i] has a taste that the protected will never know."
[url=http://www.naxja.org/forum/showthread.php?t=73349]GUIDE TO SEARCHING. [i] (Some of the forum software is different but, it has helped me a lot.)[/i][/url][/b]
[b]"Those who don't know history are destined to repeat it." Edmund Burke[/b][/size]
[url=http://www.naxja.org/forum/showthread.php?t=73349]GUIDE TO SEARCHING. [i] (Some of the forum software is different but, it has helped me a lot.)[/i][/url][/b]
[b]"Those who don't know history are destined to repeat it." Edmund Burke[/b][/size]
-
F9K9
- Mod K Elite
- Posts: 6183
- Joined: Sun May 30, 2004 12:26 pm
- Location: London, Kentucky, United States
How are your back-up lights performing, BAD?
[size=75][b]"For those who have fought for it, [i][color=red]FR[/color][color=white]EE[/color][color=blue]DOM[/color][/i] has a taste that the protected will never know."
[url=http://www.naxja.org/forum/showthread.php?t=73349]GUIDE TO SEARCHING. [i] (Some of the forum software is different but, it has helped me a lot.)[/i][/url][/b]
[b]"Those who don't know history are destined to repeat it." Edmund Burke[/b][/size]
[url=http://www.naxja.org/forum/showthread.php?t=73349]GUIDE TO SEARCHING. [i] (Some of the forum software is different but, it has helped me a lot.)[/i][/url][/b]
[b]"Those who don't know history are destined to repeat it." Edmund Burke[/b][/size]
-
HenryJ
- Admin K Elite
- Posts: 12706
- Joined: Tue Oct 01, 2002 9:14 pm
- Location: Ontario, Oregon
- Contact:
This is the same as I use on my old truck-
NAPA Online page

Item#: BK 7355799
Price: $15.99
Attributes:
Manufacturer:Pilot Automotive
Style Name:Rubber Housing Utility Light
Material:Rubber
Dimensions:4"
Color:Black
Installation Type:to Bracket to Vehicle
Package Contents:Light Brackets Installation Hardware & Instructions
Sure seems like I paid less, but it has been quite a while ago now. They are located by the truck parts (mirrors, flagging , clearance/marker lamps, tail lights, etc.)
NAPA Online page
Item#: BK 7355799
Price: $15.99
Attributes:
Manufacturer:Pilot Automotive
Style Name:Rubber Housing Utility Light
Material:Rubber
Dimensions:4"
Color:Black
Installation Type:to Bracket to Vehicle
Package Contents:Light Brackets Installation Hardware & Instructions
Sure seems like I paid less, but it has been quite a while ago now. They are located by the truck parts (mirrors, flagging , clearance/marker lamps, tail lights, etc.)
Last edited by HenryJ on Fri Mar 14, 2008 12:29 pm, edited 1 time in total.
"Speed doesn't kill, suddenly becoming stationary does." - Richard Hammond
"Speed is just a matter of Money - How fast do YOU want to go?"-Mechanic from Mad Max-
If at first you don't succeed - Don't take up Skydiving! - ThunderII KE7CSK
We had rain every week end for 3 weeks. I went out one Sunday to install them and found I needed a Tap to be able to mount them. By the time I found the tap The sky opened up so I decided a cold beer was a better idea. To answer your question , There still in the box.
I kinda like that Hummer set up. I like the switch system.
I kinda like that Hummer set up. I like the switch system.
[size=75]2001 S-10 Crew , A.R.E Cap, Limo tint windows, Halogen Back up lights. Bilstein Shocks, 1.5 Rear Spacers, Summit Rear Diff Cover Clear Bumper Lights, Carbon Altezza Tail Lights, Billet Grill. SS Step Bars. GM full front bra. ,,, GM Quote concerning the gurgling heater core " They all sound like that"[/size]
-
F9K9
- Mod K Elite
- Posts: 6183
- Joined: Sun May 30, 2004 12:26 pm
- Location: London, Kentucky, United States
Looks like NAPA will be visited during my lunch tomorrow, Brule, I know you are "overkill" on wiring to avoid fires and failure. Can you take the time to explain how you would wire this up? I really suck at soldering but, I keep trying
[size=75][b]"For those who have fought for it, [i][color=red]FR[/color][color=white]EE[/color][color=blue]DOM[/color][/i] has a taste that the protected will never know."
[url=http://www.naxja.org/forum/showthread.php?t=73349]GUIDE TO SEARCHING. [i] (Some of the forum software is different but, it has helped me a lot.)[/i][/url][/b]
[b]"Those who don't know history are destined to repeat it." Edmund Burke[/b][/size]
[url=http://www.naxja.org/forum/showthread.php?t=73349]GUIDE TO SEARCHING. [i] (Some of the forum software is different but, it has helped me a lot.)[/i][/url][/b]
[b]"Those who don't know history are destined to repeat it." Edmund Burke[/b][/size]
-
04crewvt

- Crew K Elite

- Posts: 1466
- Joined: Sat Oct 22, 2005 8:24 am
- Location: St Albans Vermont
- Contact:
Those are the same ones I use on my big pickup. They are directly wired to the backup lamps without any relays. The ones I have for the crew that I haven't gotten around to cutting into the bumper are these.Hella FF75
[size=75]Why does the universe decree that if you have all the time in the world to work on projects you have no money and vice versa?
Green 2004 ZR-5 w/ too much to list here: http://www.cardomain.com/ride/2296465[/size]
Green 2004 ZR-5 w/ too much to list here: http://www.cardomain.com/ride/2296465[/size]
-
HenryJ
- Admin K Elite
- Posts: 12706
- Joined: Tue Oct 01, 2002 9:14 pm
- Location: Ontario, Oregon
- Contact:
Oh, geez! Now you mean I have to practice what I preach?f9k9 wrote:...I know you are "overkill" on wiring to avoid fires and failure. Can you take the time to explain how you would wire this up?
The first thing I would offer is that this is not a critical application. Safety issues in a failure are limited. Therefore pushing the maximum is acceptable to me.
First step would be to consult the wire gauge table. 10' from the electrical center to the tap point. 16 gauge wire is good for up to 144 watts at 12v.
I have one 50w tail lamp, an auxiliary 50w back up lamp and one stock bulb with a back alarm. I estimate it to be less than 30w. Total 130w.
That puts me under the maximum rated load for the wiring. The maximum amperage is listed as 24, so a 20 amp fuse should be adequate and still offer a safety factor.
The connection. Ideally a soldered and sealed connection is preferable. Cut the insulation of the wire to be tapped and remove 7/16" to 1/2" of the insulation. Be careful not to cut the wire. Strip 3/4" to 1" of the wire to be added and wrap it around the wire to be tapped. Solder this connection with rosin core electrical solder (Do not use solid, or acid core for electrical connections). Seal with liquid electrical tape and wrap with electrical tape. That would be a pretty good connection.
What did I do? Used a scotch lock wire tap. Those are the blue clamp over the wire taps. You can see it in the picture I posted above. These can damage the wire to be tapped, create a point of resistance, allow a point for moisture/contamination intrusion, potential for corrosion, etc.
Mine still works
"Speed doesn't kill, suddenly becoming stationary does." - Richard Hammond
"Speed is just a matter of Money - How fast do YOU want to go?"-Mechanic from Mad Max-
If at first you don't succeed - Don't take up Skydiving! - ThunderII KE7CSK
-
F9K9
- Mod K Elite
- Posts: 6183
- Joined: Sun May 30, 2004 12:26 pm
- Location: London, Kentucky, United States
Well, you know how electrically ignorant I am I was mainly interested in your connections and not all the wire gauge to load computations. Agreed, they are important and I should have worded my question a little differently.
I have got to get the soldering thing down to a crude but, correct form. I recall an instructor in an advanced law enforcement technical equipment class accuse me of welding.
I have got to get the soldering thing down to a crude but, correct form. I recall an instructor in an advanced law enforcement technical equipment class accuse me of welding.
[size=75][b]"For those who have fought for it, [i][color=red]FR[/color][color=white]EE[/color][color=blue]DOM[/color][/i] has a taste that the protected will never know."
[url=http://www.naxja.org/forum/showthread.php?t=73349]GUIDE TO SEARCHING. [i] (Some of the forum software is different but, it has helped me a lot.)[/i][/url][/b]
[b]"Those who don't know history are destined to repeat it." Edmund Burke[/b][/size]
[url=http://www.naxja.org/forum/showthread.php?t=73349]GUIDE TO SEARCHING. [i] (Some of the forum software is different but, it has helped me a lot.)[/i][/url][/b]
[b]"Those who don't know history are destined to repeat it." Edmund Burke[/b][/size]

The rubber type of lights may not look too good, but they are tough. The WV DOH uses them on the rear of their salt spreaders and has little trouble out of them out side of excessive vibration occasionally cracking the sealed beams or shaking the filiments loose.
[size=75]Mitch
2001 Polo Green Metallic, no mods,(can't afford any)[/size]
2001 Polo Green Metallic, no mods,(can't afford any)[/size]
-
HenryJ
- Admin K Elite
- Posts: 12706
- Joined: Tue Oct 01, 2002 9:14 pm
- Location: Ontario, Oregon
- Contact:
I checked today and there was a bin of them at NAPA (bulk item=cheaper) Retail was $14.77 , my cost $10.09
"Speed doesn't kill, suddenly becoming stationary does." - Richard Hammond
"Speed is just a matter of Money - How fast do YOU want to go?"-Mechanic from Mad Max-
If at first you don't succeed - Don't take up Skydiving! - ThunderII KE7CSK
-
F9K9
- Mod K Elite
- Posts: 6183
- Joined: Sun May 30, 2004 12:26 pm
- Location: London, Kentucky, United States
HenryJ wrote:I checked today and there was a bin of them at NAPA (bulk item=cheaper) Retail was $14.77 , my cost $10.09
I checked today to pick up a couple but, the ones in the bin were not the same. They will have them in Tuesday morning. I went ahead and purchased a couple bundles or wire and a package of connectors which seemed a tad on the high side but, didn't check until back in my driveway. The wire was double the marked price but, they may not have changed shelf labels or had the wrong stock in that slot on the shelf. My closest NAPA isn't all that impressive but, they have liquid tape. My favorite O'Reilly's never heard of it or Redline Water Wetter
[size=75][b]"For those who have fought for it, [i][color=red]FR[/color][color=white]EE[/color][color=blue]DOM[/color][/i] has a taste that the protected will never know."
[url=http://www.naxja.org/forum/showthread.php?t=73349]GUIDE TO SEARCHING. [i] (Some of the forum software is different but, it has helped me a lot.)[/i][/url][/b]
[b]"Those who don't know history are destined to repeat it." Edmund Burke[/b][/size]
[url=http://www.naxja.org/forum/showthread.php?t=73349]GUIDE TO SEARCHING. [i] (Some of the forum software is different but, it has helped me a lot.)[/i][/url][/b]
[b]"Those who don't know history are destined to repeat it." Edmund Burke[/b][/size]
-
F9K9
- Mod K Elite
- Posts: 6183
- Joined: Sun May 30, 2004 12:26 pm
- Location: London, Kentucky, United States
I don't doubt it. That is why I was giving them the benefit of doubt about the prices. Probably associated to my local jump in fuel prices of $.30 overnight.
[size=75][b]"For those who have fought for it, [i][color=red]FR[/color][color=white]EE[/color][color=blue]DOM[/color][/i] has a taste that the protected will never know."
[url=http://www.naxja.org/forum/showthread.php?t=73349]GUIDE TO SEARCHING. [i] (Some of the forum software is different but, it has helped me a lot.)[/i][/url][/b]
[b]"Those who don't know history are destined to repeat it." Edmund Burke[/b][/size]
[url=http://www.naxja.org/forum/showthread.php?t=73349]GUIDE TO SEARCHING. [i] (Some of the forum software is different but, it has helped me a lot.)[/i][/url][/b]
[b]"Those who don't know history are destined to repeat it." Edmund Burke[/b][/size]
-
F9K9
- Mod K Elite
- Posts: 6183
- Joined: Sun May 30, 2004 12:26 pm
- Location: London, Kentucky, United States
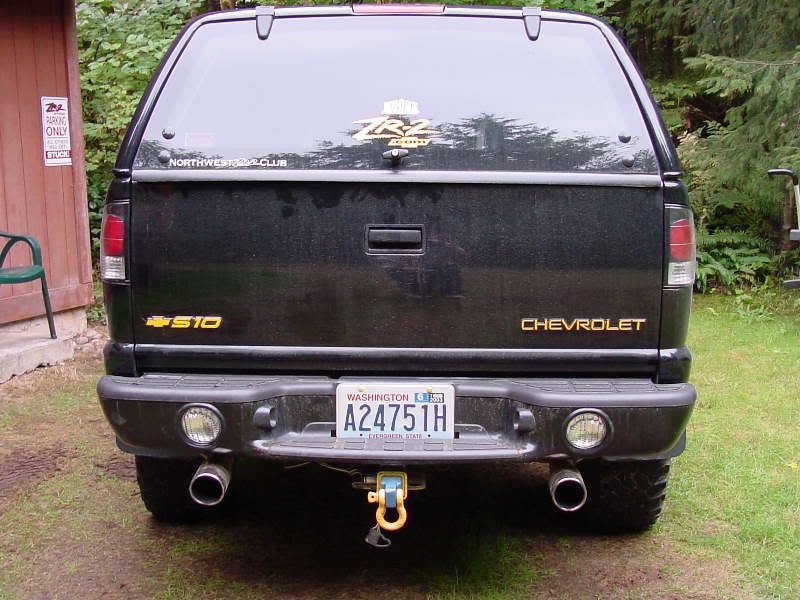
I went with Brule's aux BU light scheme but used a relay and used 2 lights. I couldn't locate ones like his original photo but, am pretty happy with my set up.

I'll post daylight photos tomorrow.


I'll post daylight photos tomorrow.
[size=75][b]"For those who have fought for it, [i][color=red]FR[/color][color=white]EE[/color][color=blue]DOM[/color][/i] has a taste that the protected will never know."
[url=http://www.naxja.org/forum/showthread.php?t=73349]GUIDE TO SEARCHING. [i] (Some of the forum software is different but, it has helped me a lot.)[/i][/url][/b]
[b]"Those who don't know history are destined to repeat it." Edmund Burke[/b][/size]
[url=http://www.naxja.org/forum/showthread.php?t=73349]GUIDE TO SEARCHING. [i] (Some of the forum software is different but, it has helped me a lot.)[/i][/url][/b]
[b]"Those who don't know history are destined to repeat it." Edmund Burke[/b][/size]
-
HenryJ
- Admin K Elite
- Posts: 12706
- Joined: Tue Oct 01, 2002 9:14 pm
- Location: Ontario, Oregon
- Contact:
Looks like daylight back there now 
"Speed doesn't kill, suddenly becoming stationary does." - Richard Hammond
"Speed is just a matter of Money - How fast do YOU want to go?"-Mechanic from Mad Max-
If at first you don't succeed - Don't take up Skydiving! - ThunderII KE7CSK