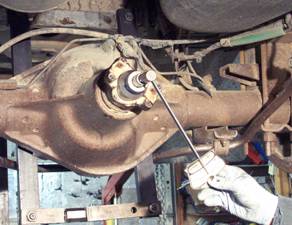
Aarrghhh Another Leak....Pinion Seal Leak????

Anything related to the stock drivetrain, engine, transmission, axles, wheels...

Moderator: F9K9

User avatar
gocntry
Crew Elite
Crew Elite
Posts: 613
Joined: Wed Mar 31, 2004 2:14 pm
Location: Va

Aarrghhh Another Leak....Pinion Seal Leak????

Post by gocntry »

I Think I Have A Pinion Seal Leak (the seal in the front of the differential).
Looks Like Gear Oil On The Underside Of The Truck, Gas Tank, Passenger Wheel & Brakes.
I Get A Nice Size Drip On The Concrete After The Truck Sits Overnight.
The Drip Fluid Smells Like Gear Oil But Has A Milky Color To It (Changed Diff FLuids Last Summer W/ Mobil 1).
Could It Have Water In It And Be Overfilled? And If The Pinion Seal Needs Changed Should I Let A Shop Do It? Or Is This Accomplished In A Home Garage?
This Looks Tricky To Me But Do-Able......

Reed, I Think You Just Did This On Your Jeep Didn't You?? Would You Do It Again Or Take It To A Shop??

The Part That Worries Me Is:

"Important
If the rotating torque is exceeded, the pinion will have to be removed and a new collapsible spacer installed"

I Think I'll Be In Over My Head If That Happens.. :lol:
Gm ESI wrote:Drive Pinion Flange/Yoke and/or Oil Seal Replacement
Tools Required
J 8614-01 Flange/Pulley Holding Tool
J 22388 Pinion Oil Seal Installer - Rear
J 33782 Pinion Oil Seal Installer
J 38694 Extension Housing Oil Pump/Seal Installer
Removal Procedure

Important
Observe and mark the positions of all the driveline components relative to the propeller shaft and the axles prior to disassembly. These components include the propeller shafts, drive axles, pinion flanges, output shafts, etc. Assemble all the components in the exact places in which you removed the parts. Follow any specifications, torque values, and measurements obtained prior to disassembly.

Raise the vehicle. Refer to Lifting and Jacking the Vehicle in General Information.
Remove the tire and wheel assemblies. Refer to Tire and Wheel Removal and Installation in Tires and Wheels.
Remove the rear brake calipers, if equipped. Refer to Brake Caliper Replacement - Rear in Disc Brakes.
Remove the brake rotors, if equipped. Refer to Brake Rotor Replacement - Rear in Disc Brakes.
Remove the brake drums, if equipped. Refer to Brake Drum Replacement in Drum Brakes.
Disconnect the propeller shaft from the drive pinion yoke. Refer to Propeller Shaft Replacement - One Piece or Propeller Shaft Replacement - Two Piece in Propeller Shaft. Position and secure the propeller shaft away from the rear axle.

Measure the amount of torque required to rotate the pinion using an inch-pound torque wrench. This will give the combined preload for the following components:
The pinion bearings
The pinion seal
The carrier bearings
The axle bearings
The axle seals
Record the measurement.

Draw an alignment mark between the pinion stem and the pinion flange/yoke.

Install the J 8614-01 as shown.
Remove the pinion nut while holding the J 8614-01 .
Remove the washer.

Install the J 8614-2 (2) and the J 8614-3 (3) into the J 8614-01 (1) as shown.
Remove the pinion yoke by turning the J 8614-3 (3) clockwise while holding the J 8614-01 (1). Use a container in order to retrieve the lubricant.

Important
Do not damage the axle housing sealing surface.

Remove the pinion oil seal using a suitable seal removal tool.
Installation Procedure

Install the new pinion oil seal using one of the following:
For vehicles with a 7.6 inch axle, 2-Door Utilities and 4WD Pickups w/ RPO M50 and w/o RPO ZR2, use the J 33782 .
For 2-Door Utilities and 4WD Pickups w/ RPO ZR2, use the J 22388 (1st design 8.6 inch axle) or the J 38694 (2nd design 8.6 inch axle).
Apply sealant, GM P/N 12346004 (Canadian P/N 10953480) or equivalent, to the splines of the pinion flange/yoke.

Important
Install the pinion gear flange/yoke to the pinion gear shaft in the same position as marked during removal in order to maintain correct driveline balance.

Install the pinion yoke. Align the marks made during removal.

Notice
Do not hammer the pinion flange/yoke onto the pinion shaft. Pinion components may be damaged if the pinion flange/yoke is hammered onto the pinion shaft.

Seat the pinion flange/yoke onto the pinion shaft by tapping it with a soft-faced hammer until a few pinion shaft threads show through the flange/yoke.
Install the washer and a new pinion nut.

Install the J 8614-01 onto the pinion flange/yoke as shown.
Notice
Refer to Fastener Notice in Cautions and Notices.

Important
If the rotating torque is exceeded, the pinion will have to be removed and a new collapsible spacer installed.

Tighten the pinion nut while holding the J 8614-01 . Tighten
Tighten the nut until the pinion end play is removed. Rotate the pinion while tightening the nut to seat the bearings.

Measure the rotating torque of the pinion. Compare this measurement with the rotating torque recorded during removal. Tighten
Tighten the nut in small increments, as needed, until the rotating torque is 0.40-0.57 N·m (3-5 lb in) greater than the rotating torque recorded during removal.

Once the specified torque is obtained, rotate the pinion several times to ensure the bearings have seated. Check the rotating torque and adjust if necessary.
Install the propeller shaft to the drive pinion flange/yoke. Refer to Propeller Shaft Replacement - One Piece or Propeller Shaft Replacement - Two Piece in Propeller Shaft.
Install the brake drums, if equipped. Refer to Brake Drum Replacement in Drum Brakes.
Install the brake rotors, if equipped. Refer to Brake Rotor Replacement - Rear in Disc Brakes.
Install the brake calipers, if equipped. Refer to Brake Caliper Replacement - Rear in Disc Brakes.
Install the tire and wheel assemblies. Refer to Tire and Wheel Removal and Installation in Tires and Wheels.
Inspect and add axle lubricant to the axle housing, if necessary. Refer to Lubricant Level Inspection - Rear Drive Axle .
Lower the vehicle.
The Crew Is Gone, Now I Have A Hoe
User avatar
killian96ss
Crew K Elite
Crew K Elite
Posts: 2669
Joined: Tue Sep 09, 2003 11:53 am
Location: Sacramento, California

Re: Aarrghhh Another Leak....Pinion Seal Leak????

Post by killian96ss »

gocntry wrote:The Part That Worries Me Is:

"Important
If the rotating torque is exceeded, the pinion will have to be removed and a new collapsible spacer installed"

I Think I'll Be In Over My Head If That Happens.. :lol:
Do you have an inch pound torque wrench?

Some prefer a "beam" type wrench, but I have used a "clicker" with the same if not better results. :wink:

All you really need to do is to make sure that the torque value/pre-load of the pinion nut before disassembly is 3-5 inch pounds more after you reassemble everything.

To be honest this is actually the easiest part of replacing the pinion seal. :wink:

Steve
User avatar
F9K9
Mod K Elite
Mod K Elite
Posts: 6183
Joined: Sun May 30, 2004 12:26 pm
Location: London, Kentucky, United States

Post by F9K9 »

Look online for a 1/4" inch-pound torque wrench (mine was like $30). like this one

Image

Then take a measurement before removing the yoke. Invest in a cheap seal puller (under $10) at any auto parts store. I tried to skip this step but, after my second seal, I ran out and grabbed one. Buy a new seal. some RTV (gasket in a tube) and install the new seal with something like a rubber mallet. Don't forget to lube the synthetic part of the seal with gear oil before reinstalling the yoke. Tighten the nut to your original readings with the torque wrench. On the jeeps they say not to reuse the original but, your GM Data instructions look pretty realistic. For someone like me I would estimate an hr to complete it with the puller, torque wrench and rubber mallet. I'd do it!

I am installing a locker in the Jeep's front axle soon and from learning here and other boards, I am not sweating it like I did the pinion seal my first time around.

Good luck!
[size=75][b]"For those who have fought for it, [i][color=red]FR[/color][color=white]EE[/color][color=blue]DOM[/color][/i] has a taste that the protected will never know."
[url=http://www.naxja.org/forum/showthread.php?t=73349]GUIDE TO SEARCHING. [i] (Some of the forum software is different but, it has helped me a lot.)[/i][/url][/b]
[b]"Those who don't know history are destined to repeat it." Edmund Burke[/b][/size]
User avatar
F9K9
Mod K Elite
Mod K Elite
Posts: 6183
Joined: Sun May 30, 2004 12:26 pm
Location: London, Kentucky, United States

Post by F9K9 »

Steve beat me again but, it's pretty easy once you jump into it. My problem was I believed a salvage yard worker that wheeled an XJ like mine and told me to throw the impact wrench to it. It takes like 200-300 ft-lbs to set the crush sleeve and I was running 90 ibs on my compressor. I locked up the rear end tighter than a drum. That's why I yanked the axle and had the sleeve replaced. That part was definitely over my head but, a seal should be no problem.
[size=75][b]"For those who have fought for it, [i][color=red]FR[/color][color=white]EE[/color][color=blue]DOM[/color][/i] has a taste that the protected will never know."
[url=http://www.naxja.org/forum/showthread.php?t=73349]GUIDE TO SEARCHING. [i] (Some of the forum software is different but, it has helped me a lot.)[/i][/url][/b]
[b]"Those who don't know history are destined to repeat it." Edmund Burke[/b][/size]
User avatar
killian96ss
Crew K Elite
Crew K Elite
Posts: 2669
Joined: Tue Sep 09, 2003 11:53 am
Location: Sacramento, California

Post by killian96ss »

gocntry, if you attempt to do this repair and run into any problems just post your questions and I'm sure a few of us will be willing to guide you through any problem you may encounter. :wink:

I have completely rebuilt several GM rear ends and know that Brule (the S10 guru) has also done the same. :)

I'm sure there are also other member here who also have good knowledge about rear end repairs and overhauls and I'm sure they will help out as well. :wink:

Steve
User avatar
HenryJ
Admin K Elite
Admin K Elite
Posts: 12706
Joined: Tue Oct 01, 2002 9:14 pm
Location: Ontario, Oregon
Contact:

Post by HenryJ »


"Speed doesn't kill, suddenly becoming stationary does." - Richard Hammond
"Speed is just a matter of Money - How fast do YOU want to go?"-Mechanic from Mad Max-
If at first you don't succeed - Don't take up Skydiving!
- ThunderII KE7CSK
User avatar
gocntry
Crew Elite
Crew Elite
Posts: 613
Joined: Wed Mar 31, 2004 2:14 pm
Location: Va

Post by gocntry »

killian96ss wrote:gocntry, if you attempt to do this repair and run into any problems just post your questions and I'm sure a few of us will be willing to guide you through any problem you may encounter. :wink:

I have completely rebuilt several GM rear ends and know that Brule (the S10 guru) has also done the same. :)

I'm sure there are also other member here who also have good knowledge about rear end repairs and overhauls and I'm sure they will help out as well. :wink:

Steve
Ok,
I Had An Appointment At The Local Trusted Shop, Was Gonna Cost $110.00 W/ Me Supplying The Parts.

So To Save The $110.00 I'm Gonna Try Fixing This Myself. :yikes:

1st Question Is How Do I Hold The Yoke While I Remove The Nut? The ESI Instructions Show A Special Tool Which I Dont Have So What Should I Hold It With?

2nd Question Is The Directions Say To Use A New Pinion Nut Is This Required Or Is The Old Nut & Some Locktite Good Enough??
The Crew Is Gone, Now I Have A Hoe
User avatar
killian96ss
Crew K Elite
Crew K Elite
Posts: 2669
Joined: Tue Sep 09, 2003 11:53 am
Location: Sacramento, California

Post by killian96ss »

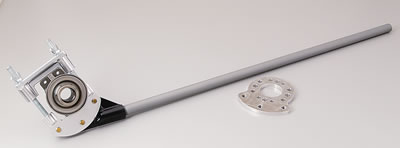
You could buy a pinion yoke holding tool (kind of expensive @ $100) or fabricate your own out of a long piece of 1" wide x 1/4" thick steel and then drill holes that match up with u-joint bolt holes to bolt it on. :wink:

If you want to buy the tool you will already be at the $100 point so having a shop do it would cost the about same. :?:

Here is a pinion yoke tool sold by Summit
Image

As far as the pinion nut, most repair manuals tell you to replace it because it is a "crimp nut" which can loose some of its tightness after being removed.

If you do reuse it I would definitely add some red thread locker to the pinion threads, but a new nut isn't very expensive so I would just replace it. :wink:

Here are a few pictures of some fabricated holding tools for ideas:

Image Image Image Image

You basically need something that will bolt onto the pinion yoke that uses the ground as your stop to prevent the yoke from turning while you tighten the pinion nut.

Even though we are talking about inch pounds for the pinion nut pre-load the actual force needed to tighten the pinion nut is a whole lot more (probably close to 100-150 foot pounds) so you need a tool to keep that yoke in place while removing and installing the nut. :wink:

Steve
User avatar
HenryJ
Admin K Elite
Admin K Elite
Posts: 12706
Joined: Tue Oct 01, 2002 9:14 pm
Location: Ontario, Oregon
Contact:

Post by HenryJ »

I have used a big crescent wrench (adjustable end wrench) , a pipe wrench and , or a pry bar to hold the yoke. What ever works.

"Speed doesn't kill, suddenly becoming stationary does." - Richard Hammond
"Speed is just a matter of Money - How fast do YOU want to go?"-Mechanic from Mad Max-
If at first you don't succeed - Don't take up Skydiving!
- ThunderII KE7CSK
User avatar
killian96ss
Crew K Elite
Crew K Elite
Posts: 2669
Joined: Tue Sep 09, 2003 11:53 am
Location: Sacramento, California

Post by killian96ss »

HenryJ wrote:I have used a big crescent wrench (adjustable end wrench) , a pipe wrench.
I never thought of trying one of those, but it makes sense, and even if the wrench wasn't long enough to brace against something you could easily place a steel pipe on the end to lengthen it. :thumb:

Steve
User avatar
gocntry
Crew Elite
Crew Elite
Posts: 613
Joined: Wed Mar 31, 2004 2:14 pm
Location: Va

Post by gocntry »

quickbiker wrote:the best way is to force the seal off the yoke, clean off all the rubber junk and convert that yoke setup to a single seal for $10. Cheaper than $100! And I have yet to have it leak.
I Got The Following Seal
$9.99 Timken 8610

Would This Be The Single Seal??
Killian96ss wrote:As far as the pinion nut, most repair manuals tell you to replace it because it is a "crimp nut" which can loose some of its tightness after being removed.

If you do reuse it I would definitely add some red thread locker to the pinion threads, but a new nut isn't very expensive so I would just replace it.
:thumb: $5.50 At The Local Dealer.....
HenryJ wrote:I have used a big crescent wrench (adjustable end wrench)
:thumb: I Borrowed A 24" Crescent Wrench Last Night

I'am At Work Until 6:30Pm, Then I'm gonna Try To Hit The Local Car Show....... So This Looks Like A Job For Tomorrow Afternoon
The Crew Is Gone, Now I Have A Hoe
User avatar
killian96ss
Crew K Elite
Crew K Elite
Posts: 2669
Joined: Tue Sep 09, 2003 11:53 am
Location: Sacramento, California

Post by killian96ss »

gocntry wrote:I Got The Following Seal
$9.99 Timken 8610

Would This Be The Single Seal?
According to Timken's web site, that is the correct part #. :wink:

I don't know if it is the 1 piece or 2 piece seal though. :?:

It should be fairly obvious when you look at it. :wink:

Steve
User avatar
gocntry
Crew Elite
Crew Elite
Posts: 613
Joined: Wed Mar 31, 2004 2:14 pm
Location: Va

Post by gocntry »

Well Sunday Turned Into A Big SNAFU Day For Me, Didnt Get Much Done On The Truck.

I Did Pull Out The Filler Plug To See How Much Gear Oil I Had Lost, Once I Pulled The Plug A Bunch Of Junk Ran Out :?:

So I Pulled The Rear Cover And Found This:

YUCK!!

So Now I Need To Relocate My Diff Vent Too I Guess, As I've Not Been Thru Any Creeks - Deep Water And I Changed My Rear Diff Last July So It Hasn't Been A Year Yet.
The Crew Is Gone, Now I Have A Hoe
User avatar
F9K9
Mod K Elite
Mod K Elite
Posts: 6183
Joined: Sun May 30, 2004 12:26 pm
Location: London, Kentucky, United States

Post by F9K9 »

Arrrrrgh, That is from rain and should have looked like that when you changed it last time.

I'd shoot everything I could with new gear oil and let it drain back out before finally closing it up. Pull the cover to do it. Screw the costs of a new gasket and the costs of gear oil.
[size=75][b]"For those who have fought for it, [i][color=red]FR[/color][color=white]EE[/color][color=blue]DOM[/color][/i] has a taste that the protected will never know."
[url=http://www.naxja.org/forum/showthread.php?t=73349]GUIDE TO SEARCHING. [i] (Some of the forum software is different but, it has helped me a lot.)[/i][/url][/b]
[b]"Those who don't know history are destined to repeat it." Edmund Burke[/b][/size]
User avatar
killian96ss
Crew K Elite
Crew K Elite
Posts: 2669
Joined: Tue Sep 09, 2003 11:53 am
Location: Sacramento, California

Post by killian96ss »

gocntry wrote:So I Pulled The Rear Cover And Found This:

YUCK!!
:yikes:

It almost looks like you have more water in there than gear oil. :shock:

Definitely relocate that vent line. :wink:

Like Reed said, it would be a good idea to remove as much of that water contamination from the differential before just filling it up and waiting for the next gear oil service.

I sprayed a lot of WD-40 all over everything (displaces moisture) and then cleaned out the bottom of the diff before I filled mine back up, but I also didn't have nearly as much water in there as you do. :?:

I wouldn't hurt to fill the diff up with some cheap gear oil and run it for a few weeks and then drain and refill with some good quality gear oil. :wink:

Steve
Last edited by killian96ss on Mon May 21, 2007 12:16 pm, edited 1 time in total.
User avatar
HenryJ
Admin K Elite
Admin K Elite
Posts: 12706
Joined: Tue Oct 01, 2002 9:14 pm
Location: Ontario, Oregon
Contact:

Post by HenryJ »

Not good. Everyone has all the right advice.
I use some brake cleaner to wash down what I can. If you have the time, raise one axle tube at a time to allow it to drain back to the center section.

The idea of filling it and draining again after 500 miles or so is a good one. That might be enough to salvage the bearings. Installing a cover with a drain plug would make that easier next time. I don't know what the budget is for this project though.
You might be able to do it "on the cheap" by adding a transmission drain plug fitting? Or weld one into the cover?
My choice would be a heavy cover to help stiffen that flexy axle housing. Think about it. You can install the cover with RTV alone if you want to. Don't get too carried away with that stuff though.

Definitely relocate that vent tube. Maybe even consider adding a filter? I don't have a good suggestion there, but maybe there is something out there that would work?
That would really worry me.

"Speed doesn't kill, suddenly becoming stationary does." - Richard Hammond
"Speed is just a matter of Money - How fast do YOU want to go?"-Mechanic from Mad Max-
If at first you don't succeed - Don't take up Skydiving!
- ThunderII KE7CSK
User avatar
F9K9
Mod K Elite
Mod K Elite
Posts: 6183
Joined: Sun May 30, 2004 12:26 pm
Location: London, Kentucky, United States

Post by F9K9 »

HenryJ wrote:...........I use some brake cleaner to wash down what I can. If you have the time, raise one axle tube at a time to allow it to drain back to the center section.............
I debated advising that if, he was not going to finish the job in one day. I read about using brake cleaner when replacing rear main seal in the Jeep I6 4.0. I pulled the pan and it was still dripping oil 2 days later so I hit it with cheap brake cleaner and it cleaned up everything and stopped any dripping. I had surface rust on everything the following morning and that concerned me.
[size=75][b]"For those who have fought for it, [i][color=red]FR[/color][color=white]EE[/color][color=blue]DOM[/color][/i] has a taste that the protected will never know."
[url=http://www.naxja.org/forum/showthread.php?t=73349]GUIDE TO SEARCHING. [i] (Some of the forum software is different but, it has helped me a lot.)[/i][/url][/b]
[b]"Those who don't know history are destined to repeat it." Edmund Burke[/b][/size]
User avatar
HenryJ
Admin K Elite
Admin K Elite
Posts: 12706
Joined: Tue Oct 01, 2002 9:14 pm
Location: Ontario, Oregon
Contact:

Post by HenryJ »

f9k9 wrote:
HenryJ wrote:...I use some brake cleaner to wash down what I can. If you have the time, raise one axle tube at a time to allow it to drain back to the center section...
I debated advising that if, he was not going to finish the job in one day... I hit it with cheap brake cleaner ... I had surface rust on everything the following morning and that concerned me.
You have raised a valid point. In this case things can not get much worse. Areas with high humidity should always worry about unprotected exposed metal surfaces.

Lift one tube let it drip, lift the other and do the same. Then level it out and wipe out as much as possible. I just wear a set of nitrile gloves and squeege out as much as possible. Then spray down with cleaner and wipe it out with rags just prior to installation of the cover.

"Speed doesn't kill, suddenly becoming stationary does." - Richard Hammond
"Speed is just a matter of Money - How fast do YOU want to go?"-Mechanic from Mad Max-
If at first you don't succeed - Don't take up Skydiving!
- ThunderII KE7CSK
User avatar
gocntry
Crew Elite
Crew Elite
Posts: 613
Joined: Wed Mar 31, 2004 2:14 pm
Location: Va

Post by gocntry »

Well I Wont Have A Chance To Work On The Truck Until Friday,

As For Re-Routing The Vent Hose Where Should It Go?? Under The Bed With The Vent Going Vertical Or Horizonal?

As For The Rear End Cover, This Is The Correct One.....It Looks To Be A Couple Bucks Cheaper Than The Others...

Summit Racing
The Crew Is Gone, Now I Have A Hoe
User avatar
killian96ss
Crew K Elite
Crew K Elite
Posts: 2669
Joined: Tue Sep 09, 2003 11:53 am
Location: Sacramento, California

Post by killian96ss »

gocntry wrote:As For Re-Routing The Vent Hose Where Should It Go?? Under The Bed With The Vent Going Vertical Or Horizonal?
It doesn't matter wether the vent is horizontal or vertical, so just find a place up under the bed (higher is better) where water (rain or car washes) won't be able to get in. :wink:

You can also help prevent water intrusion by placing a small piece of foam over the vent hole like the one on the front diff vent line.
As For The Rear End Cover, This Is The Correct One.....It Looks To Be A Couple Bucks Cheaper Than The Others...

Summit Racing
Yes, that one will work, its just like the Summit version and is the same as the one I have on my ZR2 except that one is for a 7.5" vs a 8.5' rear end.

When you get the cover take one of the supplied bolts and see if it will easily screw into one of the cover holes.

When I got the one for my ZR2 the supplied bolts were standard and I needed metric bolts. :x

I managed to get summit to send me new bolts, but I did have to pay for 1/3 of the cost of the replacement bolts since their web site clearly said "Will not fit housings that use metric mounting bolts".

The cover fit just fine, but the bolts were definitely wrong. :(

I didn't have any problems with the supplied bolts that came with the Summit version for my CC, so that means the CC should use standard bolts.

There also isn't any warning on the 7.5" diff cover about metric bolts.

You probably won't have any problems, but it doesn't hurt to check before you start. :wink:

Use teflon tape on the fill and drain plugs to prevent leaks.

Put some gasket sealer on the bearing cap pre-load bolts just prior to tightening them down to prevent oil seepage.

Fill the diff using the factory fill plug on the passenger side of the differential, and fill until the oil is right at the bottom of the hole. :wink:

Steve
User avatar
gocntry
Crew Elite
Crew Elite
Posts: 613
Joined: Wed Mar 31, 2004 2:14 pm
Location: Va

Post by gocntry »

I Finally Got To Work On The Truck This Week.
Jacked Up The Passenger Axle Tube And It Looked Like Regular Gear Oil Running Out.
Jacked Up The Driver's Side And More Of The Goop Came Running Out.
Cleaned Out The Rear As Best I Could & Sprayed It All Down With Wd-40. Put The Cover Back On With RTV Sealant And Re-Filled With Plain 'Ol 80W-90 Gear Oil.

I Moved The Vent Hose While Under There Too Is This A Better Mounting Way That The Factory?

Image
The Crew Is Gone, Now I Have A Hoe
User avatar
F9K9
Mod K Elite
Mod K Elite
Posts: 6183
Joined: Sun May 30, 2004 12:26 pm
Location: London, Kentucky, United States

Post by F9K9 »

Good place for the vent hose and your truck looks clean under there! Not "JIM clean" but, clean :wink:
[size=75][b]"For those who have fought for it, [i][color=red]FR[/color][color=white]EE[/color][color=blue]DOM[/color][/i] has a taste that the protected will never know."
[url=http://www.naxja.org/forum/showthread.php?t=73349]GUIDE TO SEARCHING. [i] (Some of the forum software is different but, it has helped me a lot.)[/i][/url][/b]
[b]"Those who don't know history are destined to repeat it." Edmund Burke[/b][/size]
User avatar
gocntry
Crew Elite
Crew Elite
Posts: 613
Joined: Wed Mar 31, 2004 2:14 pm
Location: Va

Post by gocntry »

f9k9 wrote:Your truck looks clean under there! Not "JIM clean" but, clean :wink:

:lol: :lol: :lol: None Of My Vehicles Have EVER Been "JIM clean"
The Crew Is Gone, Now I Have A Hoe