Hey guys heres the write up I promised. I did this master cylinder swap n ABS delete because of my solid axle swap. Im not going to go into detail on my swap, if you want to know more you can read my build thread. Anyways its a pretty straight forward swap. Now you could do this delete and keep the stock master if you still have your IFS, but i went with a '80 chevy 3/4 ton master for more stopping power with my bigger tires. Our stock masters have around a 1" bore, and the 3/4 ton has a 1.25" bore, which means more stopping power. Anyways this is how i did it.
Stock master vs the new 3/4 ton master
http://i407.photobucket.com/albums/pp15 ... /001-1.jpg
Useful advice:
All our stock hardlines are 1/4"
All stock line nuts are 9/16"
Stock hardlines from the frame rails up to the ABS module can be reused, you just have to cut off the 9/16" nuts and flare on 7/16" nuts.
The front resovior on the new master is for the back, the rear resovior is for the front.
Required Tools:
Tube cutter
Flare tool/kit
Tube bender
Line wrenches
Hand tools
Required Parts:
Master cylinder from an 80 3/4 ton - Cardone #10-1534
7/16-24 x 9/16-18 Brake fitting adapter - Napa #641-3309
7/16-24 x 1/2-20 Brake fitting adapter - Napa #641-3304
Adjustable Proportioning valve, I used a Jegs one - #555-63022
7/16" tube nuts - #BLF-16C-5
1/4" tee fitting - Dorman # 499-070.1 or 343522
A few pieces of 1/4" steel brake line to make up the connections.
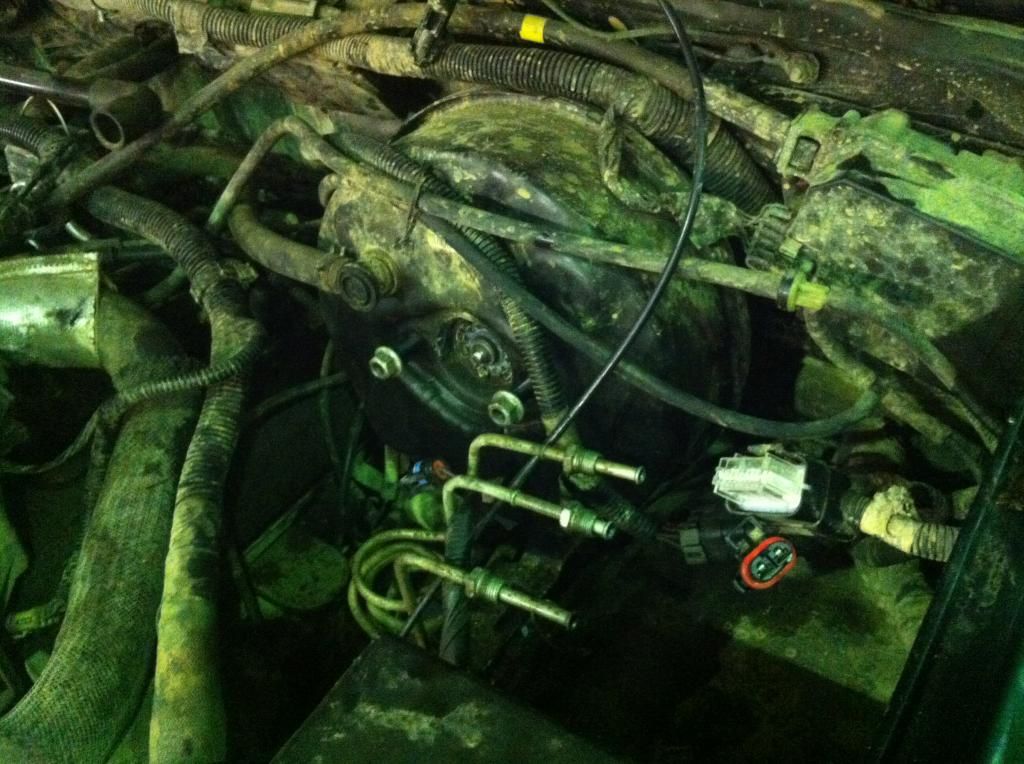
First pull off your intake from the filter to the throttle body, pull the air box from behind the head light, dicso the 5 hard lines from the ABS module, pull the 3 electrical connections form the ABS module, and then finally remove the ABS module and attaching bracket from the left inner fender.
Then disco the 2 flexible lines from the master cylinder, then unplug the electrical connections from the stock master cylinder, then remove the 2 bolts holding the master on the brake booster. Now the master can come out. try not to spill too much fluid as itll leak from the master.
http://i407.photobucket.com/albums/pp15 ... /004-1.jpg
Now with the master, ABS module, intake, and air box out of the way you can see the line clamp on top of the left shock tower, the L/R line connections at the frame rail, and the rear connection at the frame rail. I disco'd all 3 brake lines at the frame rail, pulled them out of the truck and cut.flared/bent as need to put on the 7/16th tube nuts. After that i loosely installed them back in the truck, that way i can move them as need. just remember to tighten them up before you bleed it at the end.
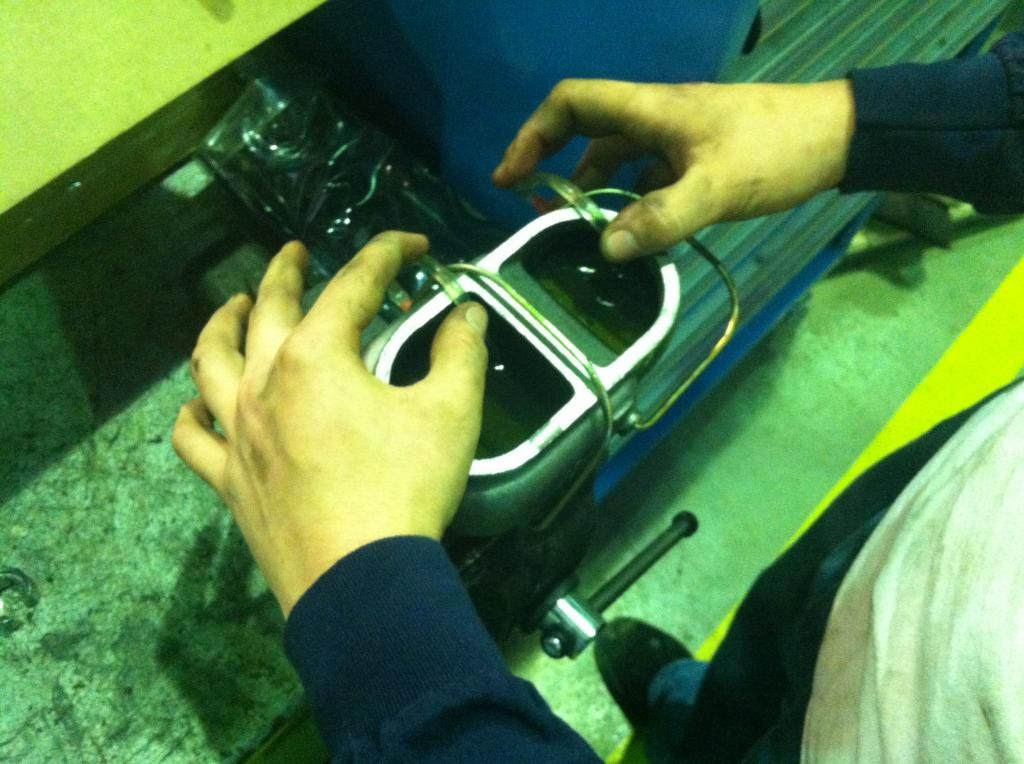
Now you can bench bleed the new master if you are swapping them, or reinstall the stock master. I choose to swap them
http://i407.photobucket.com/albums/pp15 ... /005-1.jpg
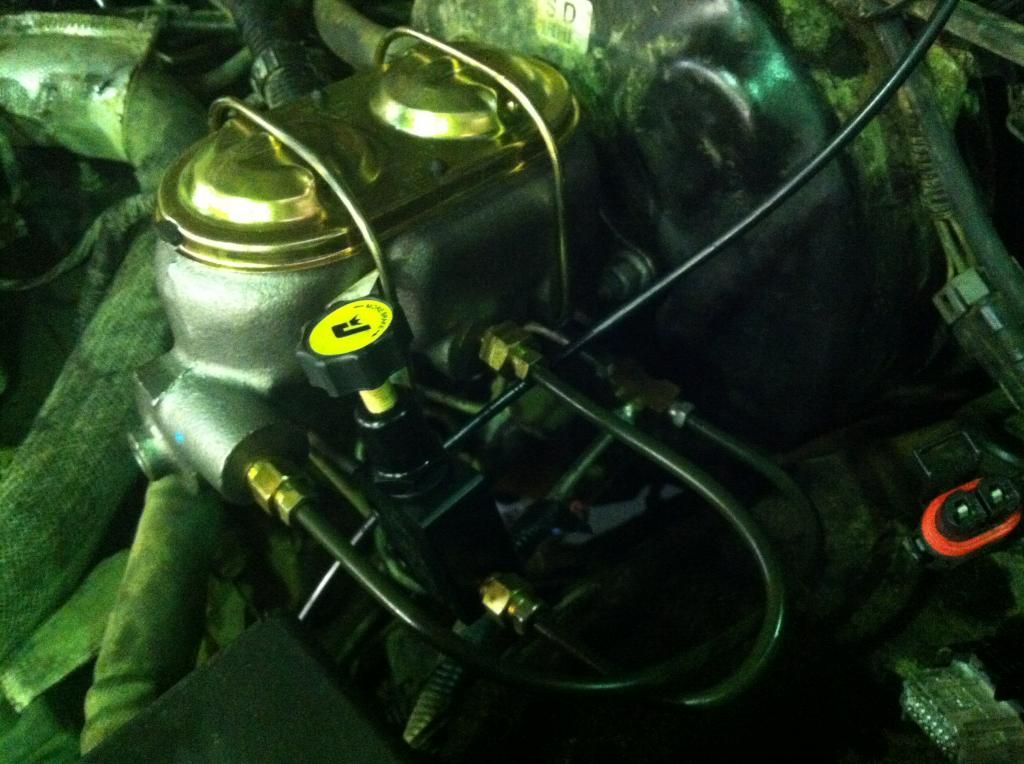
Now with the brake lines in the truck use the brake Tee fitting to tie the two front brake lines into one connection. Now youll have the rear line, and the two front lines tied to one line.connection.
Now your ready to figure out how your going to route the lines from the master to the proportiong valve, and the brake tee fitting.
NOTE: The adapters Napa #641-3309 & Napa #641-3304 go on the master, the brake tee fitting is 7/16", and the proportioning valve comes with the needed adapters for 7/16".
This is how i ended up doing it;
http://i407.photobucket.com/albums/pp15 ... /006-1.jpg
http://i407.photobucket.com/albums/pp15 ... /008-2.jpg
So once you run the connecting lines from the master to the proportioning valve/tee fitting your ready to bleed and check for leaks. Then finally after its bled and you have good pedal, you have to go to a open parking lot and brake hard to see how your brakes react, adjust the proportioning valve accordingly to were the rear locks up at the same time or slightly after the front brakes do.
After that my pedal is much firmer but it isnt excessively hard, and my truck stops really good! Hope this write up helps answer some questions! Feel free to ask me questions.
ABS Delete/MC Swap How To
Moderator: F9K9
-
paintballrocker
- Crew Elite

- Posts: 356
- Joined: Sun Mar 01, 2009 10:15 pm
- Location: RAF Lakenheath, UK
- Contact:
ABS Delete/MC Swap How To
Last edited by paintballrocker on Thu Dec 06, 2012 6:44 pm, edited 1 time in total.
[size=75]2002 CC, westin push bar with 2 lights, bed cover, custom made cat-back exhaust.......soon a steering stabilizer mod, lift, sounds system[/size]
-
HenryJ

- Admin K Elite

- Posts: 12706
- Joined: Tue Oct 01, 2002 9:14 pm
- Location: Ontario, Oregon
- Contact:
Re: ABS Delete/MC Swap How To
Well done! Bravo 
"Speed doesn't kill, suddenly becoming stationary does." - Richard Hammond
"Speed is just a matter of Money - How fast do YOU want to go?"-Mechanic from Mad Max-
If at first you don't succeed - Don't take up Skydiving! - ThunderII KE7CSK
-
paintballrocker
- Crew Elite
- Posts: 356
- Joined: Sun Mar 01, 2009 10:15 pm
- Location: RAF Lakenheath, UK
- Contact:
Re: ABS Delete/MC Swap How To
Thanks brule! did it in one day, next weekend im going to start the skidz flares, thanks to you sending those cut out templates!
[size=75]2002 CC, westin push bar with 2 lights, bed cover, custom made cat-back exhaust.......soon a steering stabilizer mod, lift, sounds system[/size]
Re: ABS Delete/MC Swap How To
looks good
01 Sonoma sls crew cab - 00 Camaro rims, lear cap w/additional led int light, reese hitch, 99 envoy dash outlets, 98 bravada switch plates & hvac knobs.
03 grand am se 3.4 auto sedan - 02 gt ram air induction parts, aftmkt taillights.
03 grand am se 3.4 auto sedan - 02 gt ram air induction parts, aftmkt taillights.
Re: ABS Delete/MC Swap How To
What about the ABS light??
2002 GMC Sonoma crew cab 4x4. Tb mod, Air box mod, pre cat delete,B&M shift improver, Trans cooler, Big three ,AD-244 alt,Red top Optima, e-fan, HD Radaitor,265/70-16' on 16x8 TA wheels,, t-bar tweek, 1.5 inch shackles and 2 inch body lift,Skids fender trim, 1.5 inch wheel spacers in front and 2.5 in back, Quad mod and Frog lights.
Transfercase vacuum switch change DO IT!!!
Transfercase vacuum switch change DO IT!!!
-
Serge PETIT

- Crew Elite
- Posts: 126
- Joined: Sat Jan 09, 2010 3:19 pm
- Location: PARIS FRANCE
Re: ABS Delete/MC Swap How To
Very interesting write-up ! Thanks . 
-
AVTekk

- Crew Elite
- Posts: 106
- Joined: Mon Nov 22, 2004 2:09 pm
- Location: South Plainfield, NJ
- Contact:
Re: ABS Delete/MC Swap How To
Looks good, well done.
-
paintballrocker
- Crew Elite
- Posts: 356
- Joined: Sun Mar 01, 2009 10:15 pm
- Location: RAF Lakenheath, UK
- Contact:
Re: ABS Delete/MC Swap How To
I havent messed with that yet. read somewhere pulling the fuse for abs on the driver side dash fuse box fixes it. if not im going to pull the dash circuit board off and jump the positive side of the abs led to the check gauses light. that way everything lights up as normal on start up but then it goes away. ill report back with what i didi to fix the lightJongo88 wrote:What about the ABS light??
[size=75]2002 CC, westin push bar with 2 lights, bed cover, custom made cat-back exhaust.......soon a steering stabilizer mod, lift, sounds system[/size]
-
F9K9
- Mod K Elite

- Posts: 6183
- Joined: Sun May 30, 2004 12:26 pm
- Location: London, Kentucky, United States
Re: ABS Delete/MC Swap How To
X2HenryJ wrote:Well done! Bravo
Where did you come up with the idea of using the '80 3/4 ton MC?
[size=75][b]"For those who have fought for it, [i][color=red]FR[/color][color=white]EE[/color][color=blue]DOM[/color][/i] has a taste that the protected will never know."
[url=http://www.naxja.org/forum/showthread.php?t=73349]GUIDE TO SEARCHING. [i] (Some of the forum software is different but, it has helped me a lot.)[/i][/url][/b]
[b]"Those who don't know history are destined to repeat it." Edmund Burke[/b][/size]
[url=http://www.naxja.org/forum/showthread.php?t=73349]GUIDE TO SEARCHING. [i] (Some of the forum software is different but, it has helped me a lot.)[/i][/url][/b]
[b]"Those who don't know history are destined to repeat it." Edmund Burke[/b][/size]
Re: ABS Delete/MC Swap How To
Thank you...paintballrocker wrote:I havent messed with that yet. read somewhere pulling the fuse for abs on the driver side dash fuse box fixes it. if not im going to pull the dash circuit board off and jump the positive side of the abs led to the check gauses light. that way everything lights up as normal on start up but then it goes away. ill report back with what i didi to fix the lightJongo88 wrote:What about the ABS light??
2002 GMC Sonoma crew cab 4x4. Tb mod, Air box mod, pre cat delete,B&M shift improver, Trans cooler, Big three ,AD-244 alt,Red top Optima, e-fan, HD Radaitor,265/70-16' on 16x8 TA wheels,, t-bar tweek, 1.5 inch shackles and 2 inch body lift,Skids fender trim, 1.5 inch wheel spacers in front and 2.5 in back, Quad mod and Frog lights.
Transfercase vacuum switch change DO IT!!!
Transfercase vacuum switch change DO IT!!!
-
Rinkrat456
- Regular

- Posts: 16
- Joined: Wed Dec 12, 2012 8:49 pm
- Location: MN is my home, DE is my location
Re: ABS Delete/MC Swap How To
I'm wondering this too.F9K9 wrote:Where did you come up with the idea of using the '80 3/4 ton MC?
All things the same, a 1.25" bore MC actually DECREASED your line pressure to your calipers compared to the 1.00" stock bore. The main reason the 3/4 ton has the larger 1.25" bore is due to the volume requirements of the larger calipers and/or drums. If you wanted more line pressure, a 0.785" or 0.750" bore MC would have been the best choice in my opinion, but you'd have the trade off of a spongy pedal with more pedal travel.
If you wish to keep your firm, short throw pedal while increasing your line pressure, look into hydroboost. I can help with your parts selection if you'd like. My '96 has massive braking power nowadays.
2002 Sonoma Crew Cab SLS, 4.3L...stock for now.
1996 Sonoma Ext Cab SLS, Iron block LS1 5.7L, 4L65, NP241, D44/D60, E-locker, 37x12.50R17 Nitto Trail Grapplers, flat bed, roll bar, 24gal fuel tank...zombie survival vehicle.
1996 Sonoma Ext Cab SLS, Iron block LS1 5.7L, 4L65, NP241, D44/D60, E-locker, 37x12.50R17 Nitto Trail Grapplers, flat bed, roll bar, 24gal fuel tank...zombie survival vehicle.
-
paintballrocker
- Crew Elite
- Posts: 356
- Joined: Sun Mar 01, 2009 10:15 pm
- Location: RAF Lakenheath, UK
- Contact:
Re: ABS Delete/MC Swap How To
wow i did not know that. i just assumed the bigger bore would make for more pressure. oh well, trial n error with solid axle swaps haha. yea man id love to hear about a hyroboost set up! im running a D30 & 33's right now. but once me n the truck get back in the ole USA i have plans for either 1/2ton or 3/4ton axles, v8, and 37's. the main reason for the master upgrade was a prep thing for the bigger axles/tires in the future. But since you have a setup like im hoping to run eventually id like to hear about your brake setup.
[size=75]2002 CC, westin push bar with 2 lights, bed cover, custom made cat-back exhaust.......soon a steering stabilizer mod, lift, sounds system[/size]
-
Rinkrat456
- Regular
- Posts: 16
- Joined: Wed Dec 12, 2012 8:49 pm
- Location: MN is my home, DE is my location
Re: ABS Delete/MC Swap How To
You can just buy my truck.  Since I'm running an LS-engine with hydroboost it was actually VERY easy to find the parts at your local auto store. The 4.3L and LS-engine power steering pumps are in similar locations, you may be able to use the same setup actually.
Starting at the pump, I have a ported power steering pump from a hydroboost 6.0L truck. It's the most powerful pump I've found available for under $50 bucks. Its rated at 1.7GPM at 400rpm and 3.6GPM at 1600rpm and is rated for 1550psi before the valve limits the pressure. I ported and shimmed the valve for more flow and higher pressure, and bolted on a smaller pulley to spin the pump a few % faster at idle.
My hydroboost unit is from a Chev Astro/GMC Safari van. I don't recall the exact year, but there are two different models of Astro/Safari hydroboost units and mine is the older style that comes out straight from the firewall instead of angled down like the newer style. The hydroboost unit runs off the power steering pump and multiplies your braking input from the brake pedal more than what a vacuum booster is capable of. Since the hydroboost unit adds so much pressure, I was able to decrease the line pressure a little bit and use a larger bore MC to give me back my firm short-throw brake pedal. It's like having my cake and eating it too. I got mine from an '87 3/4 ton Suburban diesel, and it's 1-1/8" bore. Any 1-1/8" large reservoir MC would have worked and if I ever have issues with my current MC, I'm swapping in a 1-1/8 from a newer full size truck (larger reservoir).
After installing a large p/s cooler, the whole system works together with the steering gear box. Speaking of gear box, I swapped my puny '96 2wd Sonoma steering box out from a '98 Dodge 1 ton diesel. This box only fits a 2wd, but I got lucky because the Dodge pitman arm has 4" of drop and has a 7" throw...which is the longest, strongest factory pitman arm I've been able to find. It's such a strong box for turning tall tires (or a heavy truck) that I had to reinforce the frame.
The best part of this is all the power steering lines are available at most auto parts stores. The lines are from an LS-engine hydroboost truck (think Yukon XL 6.0L, LTZ or Z71 Tahoe 5.3L, 2500HD 6.0L, 3500HD 6.0L...ect). There are two high pressure lines and two low pressure lines. All can be found at the parts store pre-made, and might just require a slight tweaking of the hard line to get it to fit perfectly.
For you, the downside to using an XJ Dana 30 is the small brakes; otherwise I think it's a great little axle. My wife's XJ had a 4.5" lift, 35's, Dana 30 front and a drum brake 8.25" rear end and those brakes sucked! You're basically running the same setup in terms of braking power, so if you're planning on keeping your axles hydroboost is the only way to go in my opinion. 1/2 ton or 3/4 ton axles would allow you to increase your brake size dramatically. You're almost guaranteed 12" front rotors and disc brake conversions usually spec 12" rear rotors as well, so all you'd need are good calipers and sticky pads. My F250 front axle has 12" front rotors and dual piston front calipers with Hawk racing HD truck pads. The rear Dana 60 came with drums originally but I swapped those for 12.5" Chevy rotors and huge single piston calipers, also with Hawk racing HD truck pads. My truck stops better now than it did from the factory with stock tires and axle (originally was 2wd).
2002 Sonoma Crew Cab SLS, 4.3L...stock for now.
1996 Sonoma Ext Cab SLS, Iron block LS1 5.7L, 4L65, NP241, D44/D60, E-locker, 37x12.50R17 Nitto Trail Grapplers, flat bed, roll bar, 24gal fuel tank...zombie survival vehicle.
1996 Sonoma Ext Cab SLS, Iron block LS1 5.7L, 4L65, NP241, D44/D60, E-locker, 37x12.50R17 Nitto Trail Grapplers, flat bed, roll bar, 24gal fuel tank...zombie survival vehicle.
-
F9K9
- Mod K Elite
- Posts: 6183
- Joined: Sun May 30, 2004 12:26 pm
- Location: London, Kentucky, United States
Re: ABS Delete/MC Swap How To
If, you find the time, wanna fill out a little more of your profile? I might wanna drop by and look at your "junk"Rinkrat456 wrote:You can just buy my truck.
[size=75][b]"For those who have fought for it, [i][color=red]FR[/color][color=white]EE[/color][color=blue]DOM[/color][/i] has a taste that the protected will never know."
[url=http://www.naxja.org/forum/showthread.php?t=73349]GUIDE TO SEARCHING. [i] (Some of the forum software is different but, it has helped me a lot.)[/i][/url][/b]
[b]"Those who don't know history are destined to repeat it." Edmund Burke[/b][/size]
[url=http://www.naxja.org/forum/showthread.php?t=73349]GUIDE TO SEARCHING. [i] (Some of the forum software is different but, it has helped me a lot.)[/i][/url][/b]
[b]"Those who don't know history are destined to repeat it." Edmund Burke[/b][/size]
-
Rinkrat456
- Regular
- Posts: 16
- Joined: Wed Dec 12, 2012 8:49 pm
- Location: MN is my home, DE is my location
Re: ABS Delete/MC Swap How To
I've looked for a place to add a profile description but haven't found it yet. Or does everyone around here just use the "interests" section under "job description"?
2002 Sonoma Crew Cab SLS, 4.3L...stock for now.
1996 Sonoma Ext Cab SLS, Iron block LS1 5.7L, 4L65, NP241, D44/D60, E-locker, 37x12.50R17 Nitto Trail Grapplers, flat bed, roll bar, 24gal fuel tank...zombie survival vehicle.
1996 Sonoma Ext Cab SLS, Iron block LS1 5.7L, 4L65, NP241, D44/D60, E-locker, 37x12.50R17 Nitto Trail Grapplers, flat bed, roll bar, 24gal fuel tank...zombie survival vehicle.
-
HenryJ
- Admin K Elite
- Posts: 12706
- Joined: Tue Oct 01, 2002 9:14 pm
- Location: Ontario, Oregon
- Contact:
Re: ABS Delete/MC Swap How To
He is referring to your personal profile information. User Control Panel
"Speed doesn't kill, suddenly becoming stationary does." - Richard Hammond
"Speed is just a matter of Money - How fast do YOU want to go?"-Mechanic from Mad Max-
If at first you don't succeed - Don't take up Skydiving! - ThunderII KE7CSK
-
Rinkrat456
- Regular
- Posts: 16
- Joined: Wed Dec 12, 2012 8:49 pm
- Location: MN is my home, DE is my location
Re: ABS Delete/MC Swap How To
I've updated that as far as it can realistically go...for a full mods list you can visit this I guess.HenryJ wrote:He is referring to your personal profile information. User Control Panel
http://www.mys10.com/member.php?u=1987
2002 Sonoma Crew Cab SLS, 4.3L...stock for now.
1996 Sonoma Ext Cab SLS, Iron block LS1 5.7L, 4L65, NP241, D44/D60, E-locker, 37x12.50R17 Nitto Trail Grapplers, flat bed, roll bar, 24gal fuel tank...zombie survival vehicle.
1996 Sonoma Ext Cab SLS, Iron block LS1 5.7L, 4L65, NP241, D44/D60, E-locker, 37x12.50R17 Nitto Trail Grapplers, flat bed, roll bar, 24gal fuel tank...zombie survival vehicle.
-
HenryJ
- Admin K Elite
- Posts: 12706
- Joined: Tue Oct 01, 2002 9:14 pm
- Location: Ontario, Oregon
- Contact:
Re: ABS Delete/MC Swap How To
Rinkrat456 wrote:I've updated that as far as it can realistically go..
"Speed doesn't kill, suddenly becoming stationary does." - Richard Hammond
"Speed is just a matter of Money - How fast do YOU want to go?"-Mechanic from Mad Max-
If at first you don't succeed - Don't take up Skydiving! - ThunderII KE7CSK
-
paintballrocker
- Crew Elite
- Posts: 356
- Joined: Sun Mar 01, 2009 10:15 pm
- Location: RAF Lakenheath, UK
- Contact:
Re: ABS Delete/MC Swap How To
what is the fun in buying a rig already built? hahaRinkrat456 wrote:You can just buy my truck.
but seriously, thanks for all the info. Im going to have to look into it alot more. I might end up doing the mod before I swap axles.
[size=75]2002 CC, westin push bar with 2 lights, bed cover, custom made cat-back exhaust.......soon a steering stabilizer mod, lift, sounds system[/size]