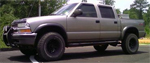
does this look "normal"????????
i've taken several photos of my rear rotors...going to dealer tomorrow!!
Moderator: F9K9


top_sgt wrote:does this look "normal"????????


Why did you have to replace your front rotors at 28k?top_sgt wrote:mechanically,,, the brakes work ok......i replaces the fronts at about 28,000 miles.. a week later i start hearing noises when braking. tonight i took things apart for a "complete" inspection. fronts OK!!!!!!
rears rotors look like @#$%!!!!!

daevans315 wrote:
I’m not sure I buy his explanation 100% but it seems plausible.
I'm certainly not a brake system expert, but what you are being told sounds like completedaevans315 wrote:I’m not sure I buy his explanation 100% but it seems plausible.

Yes, Mother dearestkillian96ss wrote:I definitely check the caliper slide pins every oil change, but I only lube them every other oil change (every 8k miles).Make sure you use a good high temperature synthetic caliper grease, and NEVER ever use chassis grease. One other thing you should check while lubing the slide pins is the little rubber boots that hold the grease in. If any of them are starting crack or the rubber is torn make sure you get new ones very soon.
Steve

Just for sh_ts and giggles, were the pins in the same location on both rear sides, i.e., lowest ones?WVHogRider wrote:................... Lubed all pins except the two that were stuck on the rear. One on each rear. I couldn't budge them.
WVHogRider wrote:Those pins are a PITB.
For some reason the rear slide pins always seem to freeze first.Lubed all pins except the two that were stuck on the rear. One on each rear. I couldn't budge them.


The best aftermarket performance rotors I have seen lately are from Power Slot.HenryJ wrote:What are our options for performance rotors?
I would like to have a set that are coated , or protected. Maybe even slotted or ventilated?
Seems as if I have seen some with an aluminum coating to protect the surfaces that are not cleaned by braking.
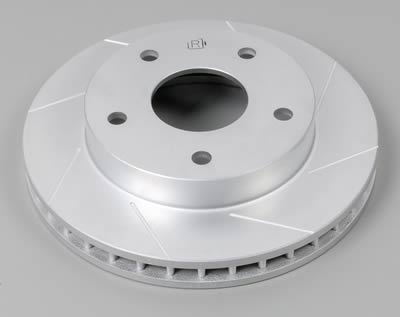
Summit wrote:Brand: Power Slot
Product Line: Power Slot Performance Brake Rotors
Intended for Street Use: Yes
For Use with Stock Calipers: Yes
Rotor Construction: Vented
Rotor Style: Slotted surface
Rotor Outside Diameter (in): 10.820 in.
Rotor Thickness (in): 1.138 in.
Rotor Material: Iron
Rotor Finish: Silver cadmium plated
Quantity: Sold individually.
Brake Rotor, Slotted, Iron, Silver Cadmium Plated, Left Front, Chevy/GMC/Oldsmobile, S-Series/Bravada, Each
Improve stopping power!
These Power Slot performance brake rotors are designed to improve your stopping power and eliminate brake fade. They feature a Vac-U-Slot design that sheds heat and gaskets faster, while maintaining a clean pad surface, significantly reducing brake fade. Only the finest castings are used for optimum rotor wear, balance, and reliability, and silver cadmium plating provides superior corrosion resistance and helps retain that new look. These rotors are a terrific choice to replace your OE rotors.
The garage I worked at in high school wouldn't turn them if they were really rusty. As cheap as they are I wouldnt waste time or money turning themkillian96ss wrote:Can't turn them because of too much rust or because they are worn past the minimum thickness?ace wrote:He said he can't turn them either. Too much rust.
Steve
Probably with US steel thoughkillian96ss wrote:... there is still a chance they are made in CHINA.
Bedding pads:StopTech wrote:PROPER BREAK-IN OF ROTORS AND PADS IS CRITICAL. Not properly doing so can cause permanent damage to rotors and adversely effect overall brake performance. Pads and rotors interact with each other to provide efficient brake performance. The break-in or bed-in procedure is done to condition the pad/rotor interface. Depending on the pad used, more or less pad material is uniformly transferred onto the disc as a thin film. The resins and bonding agents in some pads need to be heat cycled to work properly as well. By not properly bedding in pads, uneven pad material deposits can occur that may cause a vibration. Improper wear characteristics may also show up on either the pads, or rotors, or both. Always follow the recommended break-in procedure for any pads, rotors or brake systems.
The following is a guide that covers most manufacturers' recommendations (it is best to contact the manufacturer for exact instructions). 1. Slowly build heat in the pad by making slow stops, being sure to allow a minute or two for the pad to cool down while the car continues to move. 2. Repeat above step two or three times. 3. At full speed make hard racing type stops again, allowing cool down time between stops. 4. Repeat above steps two or three times or until brake fade is noticed. 5. Allow brake system to completely cool. Your pads should now be race ready. (It is important to remember that the pad and rotor surface must be mated to each other before ultimate performance will occur.)
RedDevil pads wrote:General procedure is the harder the break in, the better it is for the rotor and brake pad combination. We are trying to bring the rotor temperature up as high as possible on the initial break in as this will seal the rotor off with a brake pad transfer layer and you will basically be running brake pad against brake pad material. At this point the coating loses the satin finish that it had initially but the rotor has actually picked up a thousandths or two and has not lost any coating at all. Remember it is best to literally abuse the rotors early on. This procedure is the total opposite of what you would do with a cast iron rotor because of its inability to withstand shock due to the brittleness of cast iron.
Dragging the brakes on slow laps during break-in is something that must be avoided, due to the possibility of glazing over the pads. Also jacking the car up and running the car in gear and dragging the brakes must be avoided totally. If this procedure was not followed and you have experienced a glazing of the brake pads simply pull the pads up out of the caliper and deglaze then in a bead blaster. If a blaster isn’t available then you will need to take a coarse rasp file on its edge and rough the pad up knocking the hard shiny glaze off the pad. It is also very important to have a properly bled system to ensure that the calipers are clamping with full force as a spongy hydraulic pedal will cause glazing. For proper maintenance of the system it is best after very long events (100 laps or more) to deglaze the pads. In the event of short races 25 to 50 laps it is best after 2 or 3 events to deglaze and to also keep the system purged with fresh high temp fluid. Each time your brake calipers are heated and cooled the fluid will lose some of its temperature resistance along with being much more vulnerable to absorbing water into the system.
Dave Zeckhausen wrote:How to Bed-in Your Brakes
Bedding allows your brakes to reach their full potential. Until they are bedded, your brakes simply do not work as well as they can. If you've installed a big brake kit, changed your pads and rotors, or even if you've purchased a brand new car, you should set aside some time to bed the brakes in by following the instructions below. Proper bedding will improve pedal feel, reduce or eliminate brake squeal, and extend the life of your pads and rotors. For more on the theory of bedding, please refer to this excellent article by StopTech: Removing the Mystery from Brake Pad Bed-In.
Caution: After installing new pads/rotors or a big brake kit, the first few applications of the brake pedal will result in almost no braking power. Gently apply the brakes a few times at low speed in order to build up some grip before blasting down the road at high speed. Otherwise, you may be in for a nasty surprise the first time you hit the brakes at 60 mph.
When following these instructions, avoid doing it around other vehicles. Bedding is often best done early in the morning, when traffic is light, since other drivers will have no idea what you are up to and will respond in a variety of ways ranging from fear to curiosity to aggression. An officer of the law will probably not understand when you try to explain why you were driving erratically! Zeckhausen Racing does not endorse speeding on public roads and takes no responsibility for any injuries or tickets you may receive while following these instructions.
1.
From a speed of about 60mph, gently apply the brakes a couple of times to bring them up to operating temperature. This prevents you from thermally shocking the rotors and pads in the next steps.
2.
Make a series of eight near-stops from 60 to about 10 mph. Do it HARD by pressing on the brakes firmly, just shy of locking the wheels or engaging ABS. At the end of each slowdown, immediately accelerate back to 60mph. DO NOT COME TO A COMPLETE STOP! If you stop completely and sit for any length of time with your foot on the brake pedal, you will imprint pad material onto the hot rotors, which can lead to vibration, uneven braking, and could even ruin the rotors. With some less aggressive street pads, you may need fewer than eight near-stops. If your pedal gets soft or you feel the brakes going away, then you've done enough. Proceed to the next step.
3.
The brakes may begin to fade slightly after the 7th or 8th near-stop. This fade will stabilize, but not completely go away until the brakes have fully cooled. A strong smell from the brakes, and even smoke, is normal.
4.
After the 8th near-stop, accelerate back up to speed and cruise for a while, using the brakes as little as possible. The brakes need 5 to 10 minutes to cool down. Try not to become trapped in traffic or come to a complete stop while the brakes are still hot.
5.
If club race pads, such as Hawk Blue, are being used, add four near-stops from 80 to 10mph. If full race pads, such as Performance Friction 01 or Hawk HT 14, are being used, add four near-stops from 100 to 10 mph.
6.
After the break-in cycle, there should be a slight blue tint and a light gray film on the rotor face. The blue tint tells you the rotor has reached break-in temperature and the gray film is pad material starting to transfer onto the rotor face. This is what you are looking for. The best braking occurs when there is an even layer of of pad material deposited across the face of the rotors. This minimizes squealing, increases braking torque, and maximizes pad and rotor life.
7.
After the first break in cycle shown above, the brakes may still not be fully broken in. A second bed-in cycle, AFTER the brakes have cooled down fully from the first cycle, may be necessary before the brakes really start to perform well. This is especially true if you have installed new pads on old rotors. If you've just installed a big brake kit, the pedal travel may not feel as firm as you expected. After the second cycle, the pedal will become noticeably firmer. If necessary, bleed the brakes to improve pedal firmness.
Looks like these may be in my future. I will be needing brakes in the next year. I would like to try these.